zaki work log

作業ログやら生活ログやらなんやら

(小ネタ) systemctlでサービスの有効化と起動を同時に設定

systemctl enableのオプションに--nowというのを追加できた…!

いつもいつも

# systemctl enable docker
# systemctl start docker

みたいに実行してて、「コマンド2回たたくの面倒だなー」か、「インストールしたときenable忘れて、何日も経った後にrebootしたらサービスが起動してないムキー」のどっちかをよくやらかしてたんだけど、

# systemctl enable --now docker

で有効化と起動を同時に設定できました。

以下man systemctlより。

--now

When used with enable, the units will also be started. When used with disable or mask, the units will also be stopped. The start or stop operation is only carried out
when the respective enable or disable operation has been successful.


Installing kubeadm - Kubernetes

これ見てて初めて知った。


Ansibleだとsystemdモジュールとか使えば、enabled: yesも設定しておけば、restartやstartついでにenable設定もやってくれる。

[Python] オフライン環境でpipする

インターネットに繋がらないホストでpip installするには、パッケージファイル指定インストールかローカルPyPIサーバを用意する。

普通にやっても

[zaki@centos1 ~]$ pip install pypdf2
Collecting pypdf2
  Retrying (Retry(total=4, connect=None, read=None, redirect=None)) after connection broken by 'NewConnectionError('<pip._vendor.requests.packages.urllib3.connection.VerifiedHTTPSConnection object at 0x7fb49849a310>: Failed to establish a new connection: [Errno 101] \xe3\x83\x8d\xe3\x83\x83\xe3\x83\x88\xe3\x83\xaf\xe3\x83\xbc\xe3\x82\xaf\xe3\x81\xab\xe5\xb1\x8a\xe3\x81\x8d\xe3\x81\xbe\xe3\x81\x9b\xe3\x82\x93',)': /simple/pypdf2/
  Retrying (Retry(total=3, connect=None, read=None, redirect=None)) ...
:
:

当然PyPIリポジトリに繋がらないのでインストールできない。

以下、記事中のプロンプトがcentos1となっていホストがオフライン、managerとなっているのがネットへの接続制限のないオンライン環境のホストです。

オンライン環境でライブラリをダウンロードして手動で

[zaki@manager pip]$ pip download six
Collecting six
  Downloading https://files.pythonhosted.org/packages/65/eb/1f97cb97bfc2390a276969c6fae16075da282f5058082d4cb10c6c5c1dba/six-1.14.0-py2.py3-none-any.whl
  Saved ./six-1.14.0-py2.py3-none-any.whl
Successfully downloaded six
You are using pip version 8.1.2, however version 20.0.2 is available.
You should consider upgrading via the 'pip install --upgrade pip' command.
[zaki@manager pip]$ ls -l six-1.14.0-py2.py3-none-any.whl 
-rw-rw-r--. 1 zaki zaki 10938  3月 18 07:28 six-1.14.0-py2.py3-none-any.whl
[zaki@centos1 pip]$ sudo pip install six-1.14.0-py2.py3-none-any.whl 
Processing ./six-1.14.0-py2.py3-none-any.whl
Installing collected packages: six
Successfully installed six-1.14.0

ローカルPyPIリポジトリを作る

(準備)ライブラリダウンロード

ダウンロードするとこまでは同じ

[zaki@manager pip]$ pip download jinja2
Collecting jinja2
  Downloading https://files.pythonhosted.org/packages/27/24/4f35961e5c669e96f6559760042a55b9bcfcdb82b9bdb3c8753dbe042e35/Jinja2-2.11.1-py2.py3-none-any.whl (126kB)
    100% |████████████████████████████████| 133kB 3.3MB/s 
  Saved ./Jinja2-2.11.1-py2.py3-none-any.whl
Collecting MarkupSafe>=0.23 (from jinja2)
  Downloading https://files.pythonhosted.org/packages/fb/40/f3adb7cf24a8012813c5edb20329eb22d5d8e2a0ecf73d21d6b85865da11/MarkupSafe-1.1.1-cp27-cp27mu-manylinux1_x86_64.whl
  Saved ./MarkupSafe-1.1.1-cp27-cp27mu-manylinux1_x86_64.whl
Successfully downloaded jinja2 MarkupSafe
You are using pip version 8.1.2, however version 20.0.2 is available.
You should consider upgrading via the 'pip install --upgrade pip' command.
[zaki@manager pip]$ ll
合計 160
-rw-rw-r--. 1 zaki zaki 126746  3月 18 07:41 Jinja2-2.11.1-py2.py3-none-any.whl
-rw-rw-r--. 1 zaki zaki  24348  3月 18 07:41 MarkupSafe-1.1.1-cp27-cp27mu-manylinux1_x86_64.whl
-rw-rw-r--. 1 zaki zaki  10938  3月 18 07:28 six-1.14.0-py2.py3-none-any.whl

pipが使えるホストが無い場合

PyPI本家にwebアクセスしてブラウザでダウンロードするしかないかな?

例えばJinja2であればここから。
サイドメニューの「Download files」からパッケージファイルをダウンロードできる。
(ただしこの場合、依存するパッケージファイルまではわからないので、pip installを試してみて足りないパッケージ名がエラーで表示されるので都度用意する…しかないのかな。スマートなやりかたわからなかった)

pypi.org

(準備)pypiserverの起動

install

[zaki@manager pip]$ sudo pip install pypiserver
[sudo] zaki のパスワード:
Collecting pypiserver
  Downloading https://files.pythonhosted.org/packages/80/b1/76541cbc2bfea31e3429d9b94ea935de438d1e35bca6a8047195a9d4b2be/pypiserver-1.3.2-py2.py3-none-any.whl (75kB)
    100% |████████████████████████████████| 81kB 2.2MB/s 
Installing collected packages: pypiserver
Successfully installed pypiserver-1.3.2
You are using pip version 8.1.2, however version 20.0.2 is available.
You should consider upgrading via the 'pip install --upgrade pip' command.

起動 (パッケージファイルを置いているディレクトリを引数に指定)

[zaki@manager pip]$ pypi-server 
Error: while trying to list root(/home/zaki/packages): [Errno 2] No such file or directory: '/home/zaki/packages'
[zaki@manager pip]$ pypi-server -p 25080 .

こうすると、プライベート環境で25080/TCPでListenするローカルPyPIサーバが起動する。

リモートからHTTPアクセスすると、使用方法が表示される。(Xが無い場合脳内HTMLパーサで変換するか可能ならlynxとか入れてみるとか)

[zaki@centos1 pip]$ curl http://172.29.0.10:25080
<!DOCTYPE html>
<html lang="en">
  <head>
    <meta charset="utf-8">
    <title>Welcome to pypiserver!</title>
  </head>
  <body>
    <h1>
      Welcome to pypiserver!
    </h1>
    <p>
      This is a PyPI compatible package index serving 2 packages.
    </p>
    <p>
      To use this server with <code>pip</code>, run the following command:
      <pre>
        <code>pip install --index-url http://172.29.0.10:25080/simple/ PACKAGE [PACKAGE2...]</code>
      </pre>
    </p>
    <p>
      To use this server with <code>easy_install</code>, run the following command:
      <pre>
        <code>easy_install --index-url http://172.29.0.10:25080/simple/ PACKAGE [PACKAGE2...]</code>
      </pre>
    </p>
    <p>
      The complete list of all packages can be found <a href="/packages/">here</a> or via the <a href="/simple/">simple</a> index.
    </p>
    <p>
      This instance is running version 1.3.2 of the <a href="https://pypi.org/project/pypiserver/">pypiserver</a> software.
    </p>
  </body>
</html>

ローカルPyPIからのpipインストール

usage通り実行すると

[zaki@centos1 pip]$ pip install --index-url http://172.29.0.10:25080/simple/ jinja2
Collecting pypdf2
  The repository located at 172.29.0.10 is not a trusted or secure host and is being ignored. If this repository is available via HTTPS it is recommended to use HTTPS instead, otherwise you may silence this warning and allow it anyways with '--trusted-host 172.29.0.10'.
  Could not find a version that satisfies the requirement pypdf2 (from versions: )
No matching distribution found for pypdf2

insecureなエラーになってしまう。。
この場合は、pipのオプションの--trusted-hostを指定する。

--trusted-host Mark this host as trusted, even though it does not have valid or any HTTPS.

[zaki@centos1 pip]$ sudo pip install --trusted-host 172.29.0.10 --index-url http://172.29.0.10:25080/simple/ jinja2
Collecting jinja2
  Downloading http://172.29.0.10:25080/packages/Jinja2-2.11.1-py2.py3-none-any.whl (126kB)
    100% |████████████████████████████████| 133kB 124.9MB/s 
Collecting MarkupSafe>=0.23 (from jinja2)
  Downloading http://172.29.0.10:25080/packages/MarkupSafe-1.1.1-cp27-cp27mu-manylinux1_x86_64.whl
Installing collected packages: MarkupSafe, jinja2
Successfully installed MarkupSafe-1.1.1 jinja2-2.11.1
[zaki@centos1 pip]$ 

インストールできました。


参考

qiita.com

qiita.com


この辺とコンボしてね

zaki-hmkc.hatenablog.com

[Ansible] packageモジュールでパッケージインストールする

Ansibleモジュールの一覧をなんとなく眺めていたらpackage – Generic OS package managerという汎用的なパッケージ管理モジュールみたいなものを見つけたので、yumaptと違ってプラットフォームに依存しないパッケージインストールができるのかなーと思って試してみた。

コントロールノード環境

$ ansible --version
ansible 2.9.2
  config file = /home/zaki/ansible/package/ansible.cfg
  configured module search path = [u'/home/zaki/.ansible/plugins/modules', u'/usr/share/ansible/plugins/modules']
  ansible python module location = /usr/lib/python2.7/site-packages/ansible
  executable location = /usr/bin/ansible
  python version = 2.7.5 (default, Aug  7 2019, 00:51:29) [GCC 4.8.5 20150623 (Red Hat 4.8.5-39)]

各ターゲットノードの/usr/bin/pythonは全て2.7系

インベントリ

[node:children]
yum
apt

[yum]
target1 ansible_host=192.168.0.141
target2 ansible_host=192.168.0.142

[apt]
debian ansible_host=192.168.0.228

[from]
control ansible_host=192.168.0.140

プレイブック

---
- hosts: node
  become: true
  tasks:
    - ping:
    - package:
        name:
          - ruby
          - tcl
        state: latest

実行

[zaki@control-node package]$ ansible-playbook -i inventory.ini playbook.yml

PLAY [node] ********************************************************************

TASK [Gathering Facts] *********************************************************
ok: [target1]
ok: [target2]
ok: [debian]

TASK [ping] ********************************************************************
ok: [debian]
ok: [target1]
ok: [target2]

TASK [package] *****************************************************************
changed: [target1]
changed: [target2]
changed: [debian]

PLAY RECAP *********************************************************************
debian                     : ok=3    changed=1    unreachable=0    failed=0    skipped=0    rescued=0    ignored=0   
target1                    : ok=3    changed=1    unreachable=0    failed=0    skipped=0    rescued=0    ignored=0   
target2                    : ok=3    changed=1    unreachable=0    failed=0    skipped=0    rescued=0    ignored=0   

これでapt系のDebianホストにも、yum系のCentOSホストにも、packageモジュールを指定した一つのタスクでパッケージインストールできた。


パッケージ名の差異

一見便利そうに見えるんだけど、apt系とyum系でパッケージ名が異なるものもあり、そのあたりはpackageモジュールで吸収してるわけではないので、使いどころはちょっと難しいかもしれない。
例えば、Apache HTTP Serverは、apt系だとapache2yum系だとhttpdという名前のパッケージになっているので、

  tasks:
    - package:
        name:
          - httpd
        state: latest

というプレイブックだと、debianではエラーになる。

fatal: [debian]: FAILED! => changed=false 
  ansible_facts:
    discovered_interpreter_python: /usr/bin/python
  cache_update_time: 1584398538
  cache_updated: false
  msg: |-
    '/usr/bin/apt-get -y -o "Dpkg::Options::=--force-confdef" -o "Dpkg::Options::=--force-confold"      install 'httpd'' failed: E: Package 'httpd' has no installation candidate

朝活のネタの予定だったけど、諸事情で朝の活動時間が少なくなって(検証までは終わったけど)ブログ書ききるまで間に合わなかった()
ついでに言うと夜も遅いので19時配信スタートのオンラインミートアップとかかなり無理くさい……ぐぬぬ

yumdownloaderを使ってインストール済みのrpmパッケージファイルをダウンロードする

既にインストール済みのパッケージだと

[root@manager rpms]# yum install --downloadonly --downloaddir=. python2-pip
読み込んだプラグイン:fastestmirror
Loading mirror speeds from cached hostfile
epel/x86_64/metalink                                     | 6.4 kB     00:00     
 * base: ftp-srv2.kddilabs.jp
 * centos-ansible26: ftp-srv2.kddilabs.jp
 * epel: ftp.jaist.ac.jp
 * extras: ftp-srv2.kddilabs.jp
 * updates: ftp-srv2.kddilabs.jp
base                                                     | 3.6 kB     00:00     
centos-ansible26                                         | 2.9 kB     00:00     
epel                                                     | 5.3 kB     00:00     
extras                                                   | 2.9 kB     00:00     
updates                                                  | 2.9 kB     00:00     
(1/3): epel/x86_64/group_gz                                |  95 kB   00:00     
(2/3): epel/x86_64/updateinfo                              | 1.0 MB   00:00     
(3/3): epel/x86_64/primary_db                              | 6.7 MB   00:00     
パッケージ python2-pip-8.1.2-12.el7.noarch はインストール済みか最新バージョンです
何もしません

この通り、ダウンロードされない。

その場合はyumdownloaderを使う。

# yum install yum-utils

してから

[root@manager rpms]# yumdownloader --resolve python2-pip
読み込んだプラグイン:fastestmirror
Loading mirror speeds from cached hostfile
 * base: ftp-srv2.kddilabs.jp
 * centos-ansible26: ftp-srv2.kddilabs.jp
 * epel: nrt.edge.kernel.org
 * extras: ftp-srv2.kddilabs.jp
 * updates: ftp-srv2.kddilabs.jp
--> トランザクションの確認を実行しています。
---> パッケージ python2-pip.noarch 0:8.1.2-12.el7 を 再インストール
--> 依存性解決を終了しました。
python2-pip-8.1.2-12.el7.noarch.rpm                        | 1.7 MB   00:01     
[root@manager rpms]# ls -l
合計 1712
-rw-r--r--. 1 root root 1752207  1月 29 15:34 python2-pip-8.1.2-12.el7.noarch.rpm

ダウンロードできました。


参考

access.redhat.com


この辺とコンボしてね

zaki-hmkc.hatenablog.com

yum updateするときに特定のパッケージを更新対象外にする

色んな事情でyumでインストールした特定パッケージのバージョンを固定したい(アップデートしたくない)場合の設定について。

環境

[zaki@manager-dev ~]$ cat /etc/redhat-release 
CentOS Linux release 7.7.1908 (Core)

ちょっと古いけどこれで。

お題

[zaki@manager-dev ~]$ ansible --version
ansible 2.4.2.0
  config file = /etc/ansible/ansible.cfg
  configured module search path = [u'/home/zaki/.ansible/plugins/modules', u'/usr/share/ansible/plugins/modules']
  ansible python module location = /usr/lib/python2.7/site-packages/ansible
  executable location = /usr/bin/ansible
  python version = 2.7.5 (default, Aug  7 2019, 00:51:29) [GCC 4.8.5 20150623 (Red Hat 4.8.5-39)]

古いにもほどがあるけど、これで。
(CentOS7系デフォルトのリポジトリyum installできるもの)

準備

Ansibleの最新バージョンがインストールされる状態にする。

epelを追加

[zaki@manager-dev ~]$ sudo yum install epel-release -y

updateを確認

[zaki@manager-dev ~]$ sudo yum update
読み込んだプラグイン:fastestmirror
Loading mirror speeds from cached hostfile
 * base: mirrors.cat.net
 * epel: mirrors.aliyun.com
 * extras: mirrors.cat.net
 * updates: mirrors.cat.net
:
:
================================================================================
 Package                 アーキテクチャー
                                        バージョン           リポジトリー  容量
================================================================================
インストール中:
 python2-passlib         noarch         1.7.1-1.el7          epel         741 k
     python-passlib.noarch 1.6.5-2.el7 を入れ替えます
更新します:
 ansible                 noarch         2.9.3-1.el7          epel          17 M
 epel-release            noarch         7-12                 epel          15 k

トランザクションの要約
================================================================================
インストール  1 パッケージ
更新          2 パッケージ

総ダウンロード容量: 18 M
Is this ok [y/d/N]: 

この通り、Ansible 2.9がインストール可能になる。 今回やりたいのは、この状況で他のパッケージはアップデートしてもいいけど、Ansibleのみアップデート対象外にするにはどうするか。

除外設定

(a) --excludeオプションで指定

[zaki@manager-dev ~]$ sudo yum update --exclude=ansible
読み込んだプラグイン:fastestmirror
Loading mirror speeds from cached hostfile
 * base: mirrors.cat.net
 * epel: ftp.yz.yamagata-u.ac.jp
 * extras: mirrors.cat.net
 * updates: mirrors.cat.net
:
:
================================================================================
 Package                 アーキテクチャー
                                        バージョン           リポジトリー  容量
================================================================================
インストール中:
 python2-passlib         noarch         1.7.1-1.el7          epel         741 k
     python-passlib.noarch 1.6.5-2.el7 を入れ替えます
更新します:
 epel-release            noarch         7-12                 epel          15 k

トランザクションの要約
================================================================================
インストール  1 パッケージ
更新          1 パッケージ

総ダウンロード容量: 756 k
Is this ok [y/d/N]: 

一応動く。

とはいえ、yumの度に毎回--exclude=ansibleを指定するのも面倒だし、そもそも忘れる。

(b) /etc/yum.conf に設定

[zaki@manager-dev ~]$ tail -2 /etc/yum.conf
# exclude setting
exclude=ansible

設定ファイルにexclude=ansibleを追加

[zaki@manager-dev ~]$ sudo yum update
:
:
================================================================================
 Package                 アーキテクチャー
                                        バージョン           リポジトリー  容量
================================================================================
インストール中:
 python2-passlib         noarch         1.7.1-1.el7          epel         741 k
     python-passlib.noarch 1.6.5-2.el7 を入れ替えます
更新します:
 epel-release            noarch         7-12                 epel          15 k

トランザクションの要約
================================================================================
インストール  1 パッケージ
更新          1 パッケージ

総ダウンロード容量: 756 k
Is this ok [y/d/N]: 

Ansible 2.9がアップデート対象から除外された。

ちなみに、こんな外部ファイルを用意してみたけど、こういうのはincludeされたりはしなかった:)

# ダメな設定
[zaki@manager-dev ~]$ cat /etc/yum/exclude.conf 
exclude=ansible

うっかりアップデートしてしまった時のダウングレード

2.9にしてしまったあとに、2.4など古いバージョンに戻したい場合

[zaki@manager-dev ~]$ ansible --version
ansible 2.9.3
  config file = /etc/ansible/ansible.cfg
  configured module search path = [u'/home/zaki/.ansible/plugins/modules', u'/usr/share/ansible/plugins/modules']
  ansible python module location = /usr/lib/python2.7/site-packages/ansible
  executable location = /usr/bin/ansible
  python version = 2.7.5 (default, Aug  7 2019, 00:51:29) [GCC 4.8.5 20150623 (Red Hat 4.8.5-39)]

同じことこっちにも書いてるけど再掲

インストール可能なバージョンをリストアップ

[zaki@manager-dev ~]$ sudo yum list ansible --showduplicate
読み込んだプラグイン:fastestmirror
Loading mirror speeds from cached hostfile
 * base: mirrors.cat.net
 * epel: ftp.yz.yamagata-u.ac.jp
 * extras: mirrors.cat.net
 * updates: mirrors.cat.net
インストール済みパッケージ
ansible.noarch                       2.9.3-1.el7                          @epel 
利用可能なパッケージ
ansible.noarch                       2.4.2.0-2.el7                        extras
ansible.noarch                       2.9.3-1.el7                          epel  
[zaki@manager-dev ~]$ 

2.9.3-1.el72.4.2.0-2.el7yumでインストール可能で、現在2.9.3-1.el7であることがわかる。

yumでダウングレード

downgradeサブコマンドを使う

[zaki@manager-dev ~]$ sudo yum downgrade ansible-2.4.2.0-2.el7
:
:
================================================================================
 Package          アーキテクチャー
                                  バージョン              リポジトリー     容量
================================================================================
ダウングレード中:
 ansible          noarch          2.4.2.0-2.el7           extras          7.6 M

トランザクションの要約
================================================================================
ダウングレード  1 パッケージ

総ダウンロード容量: 7.6 M
Is this ok [y/d/N]:

これでyで進めれば、2.4.2になる。

[zaki@manager-dev ~]$ ansible --version
ansible 2.4.2.0
:

参考

linuxfan.info


古いバージョンに固定しなくても運用できるようにしような。

GitLab CE/GitLab Runner on Docker環境でexecutorもDockerなCI/CD環境

"GitLab CE/GitLab Runner" on Docker環境で、CI/CDの実行環境であるexecutorもDockerで動かす。

f:id:zaki-hmkc:20200314192252p:plain

これまでの流れ

  1. DockerでGitLab CEを動かす
  2. GitLab CE on Dockerをdocker-composeで動かす
  3. GitLab CE on DockerにGitLab Runner on Dockerを追加

本記事は、更にGitLab Runner executorもon Dockerにする手順です。

環境

$ sudo docker version
Client: Docker Engine - Community
 Version:           19.03.5
 API version:       1.40
 Go version:        go1.12.12
 Git commit:        633a0ea
 Built:             Wed Nov 13 07:25:41 2019
 OS/Arch:           linux/amd64
 Experimental:      false

Server: Docker Engine - Community
 Engine:
  Version:          19.03.5
  API version:      1.40 (minimum version 1.12)
  Go version:       go1.12.12
  Git commit:       633a0ea
  Built:            Wed Nov 13 07:24:18 2019
  OS/Arch:          linux/amd64
  Experimental:     false
 containerd:
  Version:          1.2.10
  GitCommit:        b34a5c8af56e510852c35414db4c1f4fa6172339
 runc:
  Version:          1.0.0-rc8+dev
  GitCommit:        3e425f80a8c931f88e6d94a8c831b9d5aa481657
 docker-init:
  Version:          0.18.0
  GitCommit:        fec3683

docker executor

executorの種類についてはこちら

docs.gitlab.com

設定の追加

コンテナで構築済みのGitLab CE & GitLab Runner環境で、executorの指定にdockerと入力する。

[zaki@registry gitlab-compose]$ sudo docker-compose exec gitlab-runner bash
[sudo] zaki のパスワード:
root@365f57ba0691:/# 
root@365f57ba0691:/# gitlab-runner register
Runtime platform                                    arch=amd64 os=linux pid=376 revision=003fe500 version=12.7.1
Running in system-mode.                            
                                                   
Please enter the gitlab-ci coordinator URL (e.g. https://gitlab.com/):
https://gitlab-ce.example.org:8443/              # GitLab CEのURLを入力
Please enter the gitlab-ci token for this runner:
oQyQbs-qbp3sMYdn8MLM                             # tokenを入力
Please enter the gitlab-ci description for this runner:
[365f57ba0691]: exec-container-sample            # Runnerの名称
Please enter the gitlab-ci tags for this runner (comma separated):
                                                 # tagはとりあえず空欄
Registering runner... succeeded                     runner=oQyQbs-q
Please enter the executor: docker, parallels, docker+machine, docker-ssh+machine, kubernetes, custom, docker-ssh, shell, ssh, virtualbox:
docker                                           # executorに"docker"を指定
Please enter the default Docker image (e.g. ruby:2.6):
centos:7                                         # docker executor実行時に使用するコンテナイメージ
Runner registered successfully. Feel free to start it, but if it's running already the config should be automatically reloaded! 

executorにdockerを入力すると、実行に使用するコンテナイメージも聞かれるので、とりあえずcentos:7と入力。
登録自体は特に問題なく完了。
/etc/gitlab-runner/config.tomlに以下の設定が追加される。

[[runners]]
  name = "exec-container-sample"
  url = "https://gitlab-ce.example.org:8443/"
  token = "VrU7GY5pCBVsjnrvQkAR"
  executor = "docker"
  [runners.custom_build_dir]
  [runners.docker]
    tls_verify = false
    image = "centos:7"
    privileged = false
    disable_entrypoint_overwrite = false
    oom_kill_disable = false
    disable_cache = false
    volumes = ["/cache"]
    shm_size = 0
  [runners.cache]
    [runners.cache.s3]
    [runners.cache.gcs]

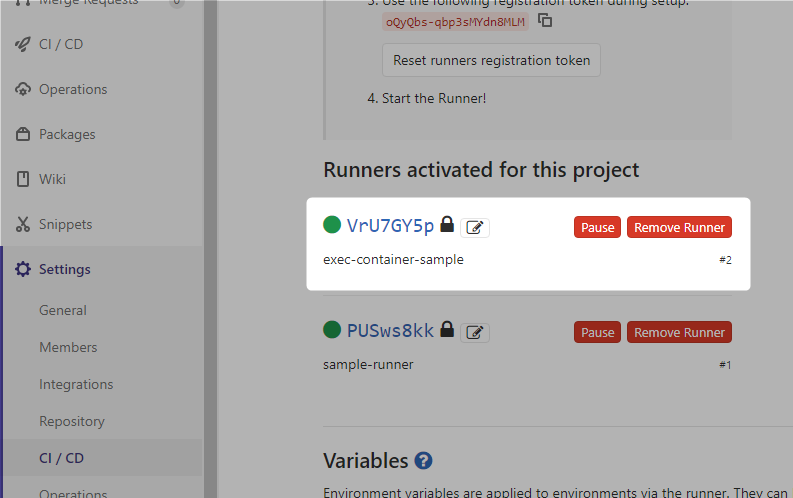
webの"Settings"->"CI/CD"の画面でも、登録した項目を確認できる。

f:id:zaki-hmkc:20200314180128p:plain

CI/CDの実行(Host is unreachable)

.gitlab-ci.ymlpushする

と、jobがfailedになった。

 Running with gitlab-runner 12.7.1 (003fe500)
   on exec-container-sample VrU7GY5p
Using Docker executor with image centos:7 ...
 Pulling docker image centos:7 ...
 Using docker image sha256:5e35e350aded98340bc8fcb0ba392d809c807bc3eb5c618d4a0674d98d88bccd for centos:7 ...
Running on runner-VrU7GY5p-project-1-concurrent-0 via 365f57ba0691...
Fetching changes with git depth set to 50...
 Initialized empty Git repository in /builds/zaki/example/.git/
 Created fresh repository.
 fatal: unable to access 'https://gitlab-ce.example.org:8443/zaki/example.git/': Failed to connect to gitlab-ce.example.org port 8443: Host is unreachable
 ERROR: Job failed: exit code 1

指定したcentos:7pullはうまくいってRunnerのコンテナ起動までは良いっぽくて、そのあとのコンテナ内からのGitLab CEへのHTTPSアクセスに失敗してる。
Runnerのコンテナを追加しようとしたときに、Dockerのコンテナ間通信のとこで、ホストOSの外部IPアドレスになっているFQDNアクセスがうまくいかなかったときと同じ状況ね。

というわけで、Dockerのexecutorも、同じDockerネットワークで動かせれば万事OKのハズなんだけど、Runner登録時のgitlab-runner registerってexecutorにdockerを指定するだけで、そんな細かい設定聞かれない。
んじゃどうするかというと、gitlab-runner register --helpしたら「細かい設定」するための大量のオプションがあった:)

# gitlab-runner register --help
Runtime platform                                    arch=amd64 os=linux pid=409 revision=003fe500 version=12.7.1
NAME:
   gitlab-runner register - register a new runner

USAGE:
   gitlab-runner register [command options] [arguments...]

OPTIONS:
   -c value, --config value                                     Config file (default: "/etc/gitlab-runner/config.toml") [$CONFIG_FILE]
   --template-config value                                      Path to the configuration template file [$TEMPLATE_CONFIG_FILE]
   --tag-list value                                             Tag list [$RUNNER_TAG_LIST]
   -n, --non-interactive                                        Run registration unattended [$REGISTER_NON_INTERACTIVE]

:
:

   --docker-network-mode value                                  Add container to a custom network [$DOCKER_NETWORK_MODE]

:
:

はい。

というか、--non-interactiveがあるので、docker execと合わせてコマンド1発で設定できそう。

既存設定を削除

root@365f57ba0691:/# gitlab-runner list
Runtime platform                                    arch=amd64 os=linux pid=456 revision=003fe500 version=12.7.1
Listing configured runners                          ConfigFile=/etc/gitlab-runner/config.toml
sample-runner                                       Executor=shell Token=PUSws8kkxEnz5Qn4npye URL=https://gitlab-ce.example.org:8443/
exec-container-sample                               Executor=docker Token=VrU7GY5pCBVsjnrvQkAR URL=https://gitlab-ce.example.org:8443/
root@365f57ba0691:/# gitlab-runner unregister -n sample-runner 
Runtime platform                                    arch=amd64 os=linux pid=482 revision=003fe500 version=12.7.1
Running in system-mode.                            
                                                   
Unregistering runner from GitLab succeeded          runner=PUSws8kk
Updated /etc/gitlab-runner/config.toml             
root@365f57ba0691:/# gitlab-runner unregister -n exec-container-sample 
Runtime platform                                    arch=amd64 os=linux pid=490 revision=003fe500 version=12.7.1
Running in system-mode.                            
                                                   
Unregistering runner from GitLab succeeded          runner=VrU7GY5p
Updated /etc/gitlab-runner/config.toml   
root@365f57ba0691:/# gitlab-runner list
Runtime platform                                    arch=amd64 os=linux pid=498 revision=003fe500 version=12.7.1
Listing configured runners                          ConfigFile=/etc/gitlab-runner/config.toml

docker networkの設定

Composeを使うことで、デフォルトのネットワークが作成されるので、それをexecutorでも指定すれば良いと思うけど、せっかくなのでネットワーク名を明示して設定する。

[zaki@registry gitlab-compose]$ sudo docker-compose up -d
Creating network "gitlab-compose_gitlab-network" with the default driver
Recreating gitlab-compose_gitlab-ce.example.org_1 ... done
Recreating gitlab-compose_gitlab-runner_1         ... done
[zaki@registry gitlab-compose]$ sudo docker network ls
NETWORK ID          NAME                            DRIVER              SCOPE
0926d5e3735c        bridge                          bridge              local
c2b0c6e7af5a        gitlab-compose_default          bridge              local
a39488d10ed4        gitlab-compose_gitlab-network   bridge              local
dd0c214d8a50        host                            host                local
ea4f23a6b8d6        none                            null                local

gitlab-compose_gitlab-networkが作成された。
(gitlab-compose_defaultが残骸として残ってしまった…)

docker network指定でRunnerの再作成

インタラクティブ版で入力してた項目は以下の通り

項目 入力値
URL https://gitlab-ce.example.org:8443/
token oQyQbs-qbp3sMYdn8MLM
description exec-container-sample
tags N/A
executor docker
Docker image centos:7

これにgitlab-compose_gitlab-networkをネットワークとして追加指定する。
というわけで、実行するgitlab-runner registerはこんな感じ。

$ gitlab_url=https://gitlab-ce.example.org:8443/
$ runner_token=oQyQbs-qbp3sMYdn8MLM
$ runner_name=exec-container-sample
$ sudo docker-compose exec gitlab-runner gitlab-runner register -n \
  --url ${gitlab_url} \
  --registration-token ${runner_token} \
  --name ${runner_name} \
  --executor docker \
  --docker-image centos:7 \
  --docker-network-mode gitlab-compose_gitlab-network

tagの指定がある場合は--tag-list foo-tag,bar-tag,...も追加する。

[zaki@registry gitlab-compose]$ sudo docker-compose exec gitlab-runner gitlab-runner register -n \
>   --url ${gitlab_url} \
>   --registration-token ${runner_token} \
>   --name ${runner_name} \
>   --executor docker \
>   --docker-image centos:7 \
>   --docker-network-mode gitlab-compose_gitlab-network
Runtime platform                                    arch=amd64 os=linux pid=43 revision=003fe500 version=12.7.1
Running in system-mode.                            
                                                   
Registering runner... succeeded                     runner=oQyQbs-q
Runner registered successfully. Feel free to start it, but if it's running already the config should be automatically reloaded! 

(コンテナ名のgitlab-runnerとコマンドのgitlab-runnerが同じで片方指定忘れでPATH上にそんなもんねぇと何度も怒られたことは秘密)

設定ファイルは以下の通り

[zaki@registry gitlab-compose]$ sudo docker-compose exec gitlab-runner cat /etc/gitlab-runner/config.toml
concurrent = 1
check_interval = 0

[session_server]
  session_timeout = 1800

[[runners]]
  name = "exec-container-sample"
  url = "https://gitlab-ce.example.org:8443/"
  token = "oT8fwM5We2xUVCS9bJKe"
  executor = "docker"
  [runners.custom_build_dir]
  [runners.docker]
    tls_verify = false
    image = "centos:7"
    privileged = false
    disable_entrypoint_overwrite = false
    oom_kill_disable = false
    disable_cache = false
    volumes = ["/cache"]
    network_mode = "gitlab-compose_gitlab-network"
    shm_size = 0
  [runners.cache]
    [runners.cache.s3]
    [runners.cache.gcs]

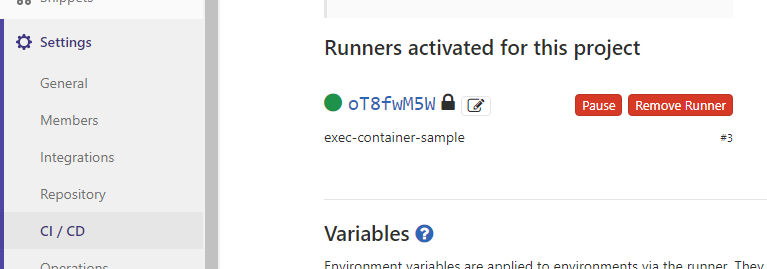
webの画面だとこの通り。

f:id:zaki-hmkc:20200314184603p:plain

jobの再実行

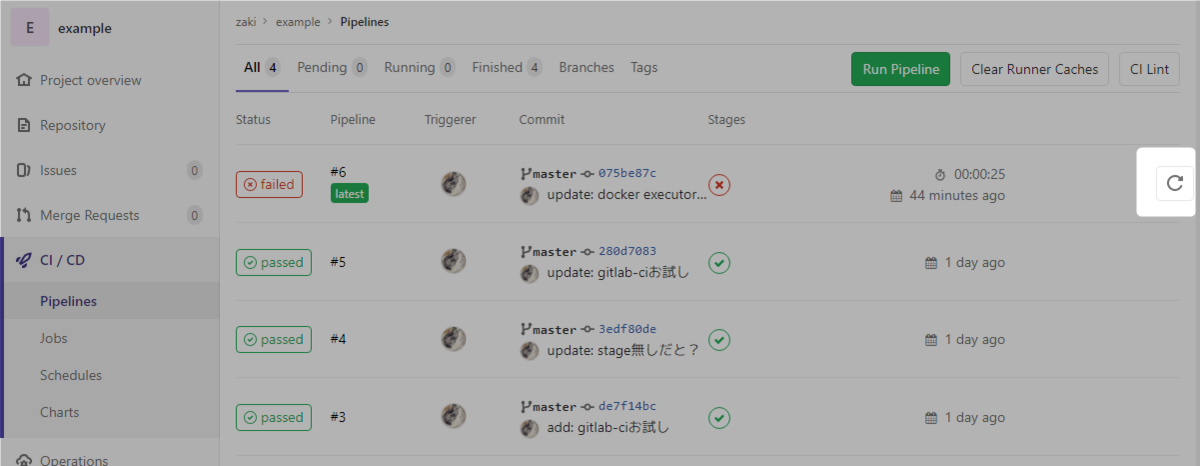
.gitlab-ci.ymlファイルをpushし直さなくても、Pipelineの一覧から失敗しているものは、リトライボタンがあるので手動で再実行できる。

f:id:zaki-hmkc:20200314185017p:plain

リトライボタン押下ですぐ再実行が始まる

f:id:zaki-hmkc:20200314185228p:plain

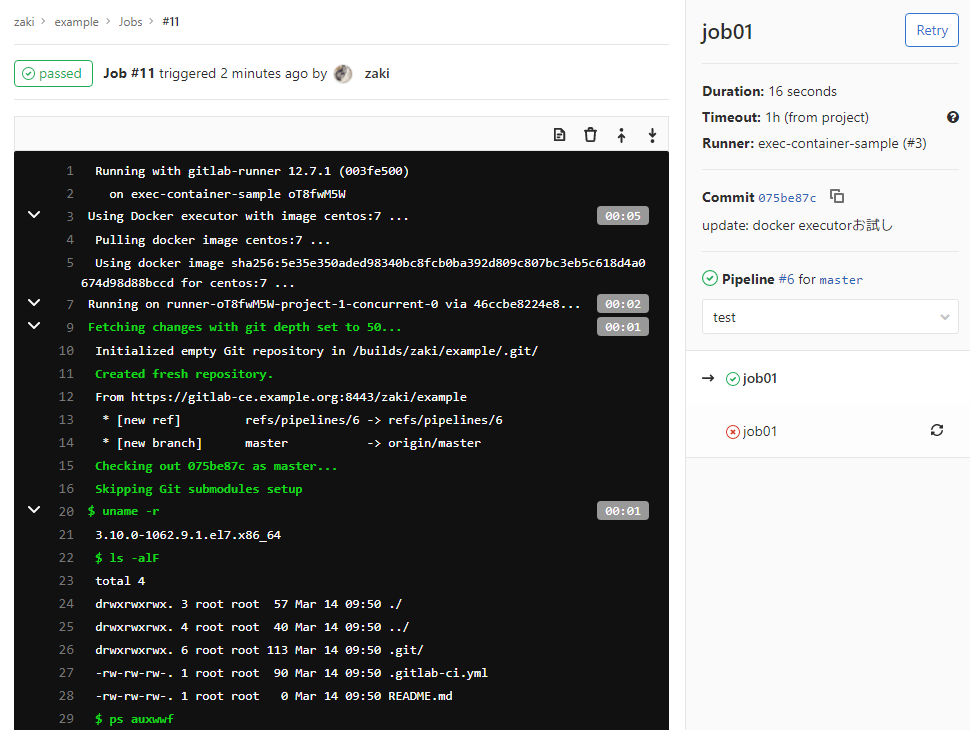
今度はうまく行きました。

f:id:zaki-hmkc:20200314185349p:plain

 Running with gitlab-runner 12.7.1 (003fe500)
   on exec-container-sample oT8fwM5W
Using Docker executor with image centos:7 ...
 Pulling docker image centos:7 ...
 Using docker image sha256:5e35e350aded98340bc8fcb0ba392d809c807bc3eb5c618d4a0674d98d88bccd for centos:7 ...
Running on runner-oT8fwM5W-project-1-concurrent-0 via 46ccbe8224e8...
Fetching changes with git depth set to 50...
 Initialized empty Git repository in /builds/zaki/example/.git/
 Created fresh repository.
 From https://gitlab-ce.example.org:8443/zaki/example
  * [new ref]         refs/pipelines/6 -> refs/pipelines/6
  * [new branch]      master           -> origin/master
 Checking out 075be87c as master...
 Skipping Git submodules setup
$ uname -r
 3.10.0-1062.9.1.el7.x86_64
 $ ls -alF
 total 4
 drwxrwxrwx. 3 root root  57 Mar 14 09:50 ./
 drwxrwxrwx. 4 root root  40 Mar 14 09:50 ../
 drwxrwxrwx. 6 root root 113 Mar 14 09:50 .git/
 -rw-rw-rw-. 1 root root  90 Mar 14 09:50 .gitlab-ci.yml
 -rw-rw-rw-. 1 root root   0 Mar 14 09:50 README.md
 $ ps auxwwf
 USER        PID %CPU %MEM    VSZ   RSS TTY      STAT START   TIME COMMAND
 root          1  0.0  0.0  11692  1388 ?        Ss   09:50   0:00 /usr/bin/bash
 root          7  0.0  0.0  11696  1000 ?        S    09:50   0:00 /usr/bin/bash
 root         11  0.0  0.0  51748  1680 ?        R    09:50   0:00  \_ ps auxwwf
 $ hostname
 runner-oT8fwM5W-project-1-concurrent-0
 $ id
 uid=0(root) gid=0(root) groups=0(root)
 Job succeeded

これで、Dockerコンテナを使ってexecutorが動くので、CI/CDの度にまっさらな状態で実行されるので、前回実行時の残骸による影響を除外して動作させることができる。

ちなみに、実行が完了してもコンテナ自体はexit 0で残り続けるので、docker ps -aすると実行完了したコンテナの残骸がどんどん溜まってるのが確認できる。適当にrmすること。

実行時のイメージの指定

executor実行環境のコンテナイメージは、executor作成時にcentos:7を指定しているが、.gitlab-ci.ymlimage設定すればそちらが優先される。

---
image: ubuntu:18.04

job01:
  script:
    - uname -r
    - ls -alF
    - ps auxwwf
    - hostname
    - id
    - ls /etc

と書いておけば、ubuntu:18.04コンテナで実行される。

docker-compose.yml

---
version: '3'
services:
  gitlab-ce.example.org:
    image: gitlab/gitlab-ce:12.7.4-ce.0
    hostname: gitlab-ce.example.org
    restart: always
    ports:
      - "8443:8443"
      - "25000:25000"
    environment:
      GITLAB_OMNIBUS_CONFIG: "external_url 'https://gitlab-ce.example.org:8443'; nginx['listen_port']=8443; gitlab_rails['registry_enabled']=true; registry_external_url 'https://gitlab-ce.example.org:25000'"
    volumes:
      - /opt/gitlab-reg/config:/etc/gitlab:Z
      - /opt/gitlab-reg/logs:/var/log/gitlab:Z
      - /opt/gitlab-reg/data:/var/opt/gitlab:Z
      - /opt/gitlab-reg/registry:/var/opt/gitlab/gitlab-rails/shared/registry:Z
      - /opt/gitlab-cert:/etc/gitlab/ssl
    networks:
      - gitlab-network
  gitlab-runner:
    image: gitlab/gitlab-runner:v12.7.1
    restart: always
    volumes:
      - /opt/gitlab-runner/config:/etc/gitlab-runner:Z
      - /var/run/docker.sock:/var/run/docker.sock
      - /opt/gitlab-cert:/etc/gitlab-runner/certs
    networks:
      - gitlab-network

networks:
  gitlab-network:

実は別の環境(ホストOSはCentOSでなくRHELでdockerも古かった気がする)だとSELinuxの影響で/var/run/docker.sockがRunnerコンテナから実行できずにexecutorが起動しなかったんだけど、おうちのCentOS(Docker 19.03)だと特に問題なかったな。。

Runnerの公式ドキュメントでSELinux周りの説明はこちら

関連


そろそろアプリ作りたいっすねぇ。。

既存のGitLab CE on Dockerに、Runnerコンテナも追加してCI/CD環境をつくる

Dockerで動かしてるGitLab CEにGitLab Runnerもコンテナで追加して、GitLab CE本体とRunnerを同じDocker上(別コンテナ)で動かして、初めてのGitLab Runnerお試し。

構成の概要としてはこんな感じ。
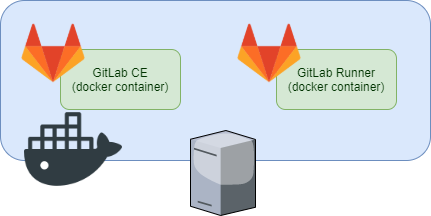
f:id:zaki-hmkc:20200313213644p:plain

お題

以前つくったGitLab CE on Dockerに、Runnerも同じDocker上でうごかす。

zaki-hmkc.hatenablog.com

zaki-hmkc.hatenablog.com

$ sudo docker-compose ps
         Name                Command          State               Ports         
--------------------------------------------------------------------------------
gitlab-                  /assets/wrapper   Up (healthy)   22/tcp, 0.0.0.0:25000-
compose_gitlab-                                           >25000/tcp, 443/tcp,
registry_1                                                80/tcp,
                                                          0.0.0.0:8443->8443/tcp

Runnerコンテナの起動

docs.gitlab.com

以下、runnerのコンテナ定義を追加

  gitlab-runner:
    image: gitlab/gitlab-runner:v12.7.1
    restart: always
    volumes:
      - /opt/gitlab-runner/config:/etc/gitlab-runner:Z
      - /var/run/docker.sock:/var/run/docker.sock

docker-compose up -dすると、Runnerのコンテナが起動。

$ sudo docker-compose ps
        Name                 Command             State              Ports       
--------------------------------------------------------------------------------
gitlab-                /assets/wrapper        Up (healthy)   22/tcp, 0.0.0.0:250
compose_gitlab-                                              00->25000/tcp,
registry_1                                                   443/tcp, 80/tcp, 0.
                                                             0.0.0:8443->8443/tc
                                                             p
gitlab-                /usr/bin/dumb-init     Up
compose_gitlab-        /entryp ...
runner_1

こんな感じ。
Runnerをただ動かすだけなら、特になんでもない。

Runnerの設定

GitLab CEでトークン確認

Runnerを試してみるプロジェクトのSettings -> CI/CD -> RunnersをExpandして、"registration token"を確認する。
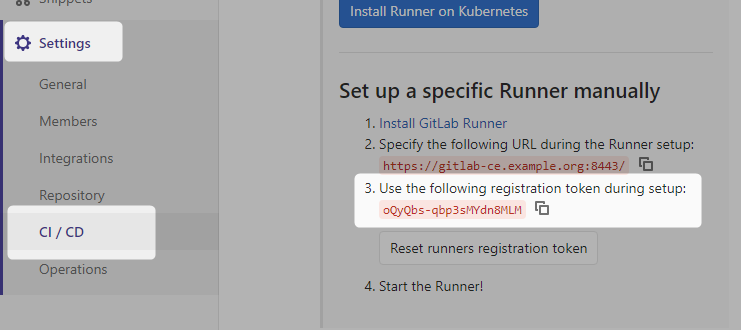
f:id:zaki-hmkc:20200313071943p:plain

(※: プロジェクト単位でなくGitLab CE全体の設定も可能だけど、ひとまずプロジェクト単位でお試し)

Runnerのregister実行

コンテナのbashを起動し、登録コマンドであるgitlab-runner registerを実行する。

docs.gitlab.com

雑に動かすとぽろぽろとエラーが出てくる。

connect: no route to host

$ sudo docker-compose exec gitlab-runner bash
root@1ccbe6c850f1:/# 
root@1ccbe6c850f1:/# gitlab-runner register
Runtime platform                                    arch=amd64 os=linux pid=29 revision=003fe500 version=12.7.1
Running in system-mode.                            
                                                   
Please enter the gitlab-ci coordinator URL (e.g. https://gitlab.com/):
https://gitlab-ce.example.org:8443/       # GitLab CEのURL入力
Please enter the gitlab-ci token for this runner:
oQyQbs-qbp3sMYdn8MLM                      # webで確認したregistration tokenを入力
Please enter the gitlab-ci description for this runner:
[1ccbe6c850f1]: sample-runner             # runnerの名前
Please enter the gitlab-ci tags for this runner (comma separated):
                                          # tagは(とりあえず)空欄
ERROR: Registering runner... failed                 runner=oQyQbs-q status=couldn't execute POST against https://gitlab-ce.example.org:8443/api/v4/runners: Post https://gitlab-ce.example.org:8443/api/v4/runners: dial tcp 192.168.0.21:8443: connect: no route to host
PANIC: Failed to register this runner. Perhaps you are having network problems 
root@1ccbe6c850f1:/# 

おや…

root@1ccbe6c850f1:/# curl -I http://gitlab-ce.example.org/yum-repo/
HTTP/1.1 200 OK
:

gitlab-ce.example.orgに対して全く通信できないわけではなさそう。(ホストOS上で動作してるhttpdサーバへは普通にアクセスできる)

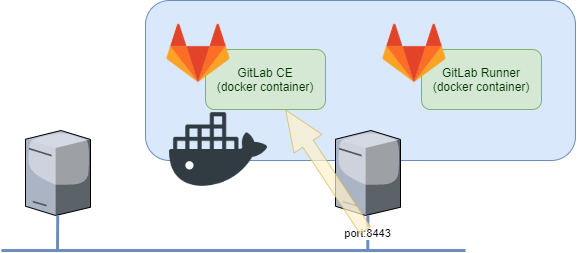
いろいろ確認した結果、「コンテナAの中から」「ホストOSのIPアドレス-pでpublishしたポート番号指定で別のコンテナBに対して」直接通信はできないっぽい。
Dockerの通信仕様というか、Dockerの通信を制御しているiptablesの仕様というか、、だいたいその辺の理由。たぶん。

f:id:zaki-hmkc:20200313215801p:plain

というわけで、RunnerのコンテナからGitLab CEのコンテナへのコンテナ間通信で、HTTPS通信するためにFQDNでアクセスしたいけど、うまい方法を思いつかないので…

GitLab CEのコンテナ名をFQDNと同じにしよう(・∀・)
(「コンテナ間通信はコンテナ名でアクセスできる」動作によって、FQDNでRunnerからGitLab CEにアクセスする)

--- a/docker-compose.yml
+++ b/docker-compose.yml
@@ -1,7 +1,7 @@
 ---
 version: '3'
 services:
-  gitlab-registry:
+  gitlab-ce.example.org:
     image: gitlab/gitlab-ce:12.7.4-ce.0
     hostname: gitlab-ce.example.org
     restart: always

これでdocker-compose up -d

[zaki@registry gitlab-compose]$ sudo docker-compose ps
       Name               Command               State                Ports
--------------------------------------------------------------------------------
gitlab-              /assets/wrapper      Up (health:          22/tcp, 0.0.0.0:2
compose_gitlab-                           starting)            5000->25000/tcp,
ce.example.org_1                                               443/tcp, 80/tcp,
                                                               0.0.0.0:8443->844
                                                               3/tcp
gitlab-              /usr/bin/dumb-init   Up
compose_gitlab-      /entryp ...
runner_1

こんな感じ。
healthyになるまで待つ。

x509: certificate signed by unknown authority

[zaki@registry gitlab-compose]$ sudo docker-compose exec gitlab-runner bash
root@32511c7a3352:/# gitlab-runner register
Runtime platform                                    arch=amd64 os=linux pid=29 revision=003fe500 version=12.7.1
Running in system-mode.                            
                                                   
Please enter the gitlab-ci coordinator URL (e.g. https://gitlab.com/):
https://gitlab-ce.example.org:8443/
Please enter the gitlab-ci token for this runner:
oQyQbs-qbp3sMYdn8MLM
Please enter the gitlab-ci description for this runner:
[32511c7a3352]: sample-runner
Please enter the gitlab-ci tags for this runner (comma separated):

ERROR: Registering runner... failed                 runner=oQyQbs-q status=couldn't execute POST against https://gitlab-ce.example.org:8443/api/v4/runners: Post https://gitlab-ce.example.org:8443/api/v4/runners: x509: certificate signed by unknown authority
PANIC: Failed to register this runner. Perhaps you are having network problems 
root@32511c7a3352:/# 

今度のエラーはわりと予想通り。

docs.gitlab.com

  gitlab-runner:
    image: gitlab/gitlab-runner:v12.7.1
    restart: always
    volumes:
      - /opt/gitlab-runner/config:/etc/gitlab-runner:Z
      - /var/run/docker.sock:/var/run/docker.sock
      - /opt/gitlab-cert:/etc/gitlab-runner/certs

GitLab CE本体でも使用している証明書ファイルが/opt/gitlab-certにあるので、Runnerでも使い回す。
volumesを使ってマウントするホストのディレクトリに、/opt/gitlab-cert:/etc/gitlab-runner/certsを追加。

まぁRun GitLab Runner in a containerのドキュメントよくよく見たら"Installing trusted SSL server certificates"の章に書いてあるんだけど…()

成功編

$ sudo docker-compose exec gitlab-runner bash
root@365f57ba0691:/# gitlab-runner register
Runtime platform                                    arch=amd64 os=linux pid=28 revision=003fe500 version=12.7.1
Running in system-mode.                            
                                                   
Please enter the gitlab-ci coordinator URL (e.g. https://gitlab.com/):
https://gitlab-ce.example.org:8443/
Please enter the gitlab-ci token for this runner:
oQyQbs-qbp3sMYdn8MLM
Please enter the gitlab-ci description for this runner:
[365f57ba0691]: sample-runner
Please enter the gitlab-ci tags for this runner (comma separated):

Registering runner... succeeded                     runner=oQyQbs-q
Please enter the executor: docker, ssh, docker-ssh+machine, custom, docker-ssh, parallels, shell, virtualbox, docker+machine, kubernetes:
shell
Runner registered successfully. Feel free to start it, but if it's running already the config should be automatically reloaded! 

お、うまくいった。
(executorの設定は、dockerkubernetesなど試したくなる項目あるけど、とりあえずshellを設定している)

webで設定の"Runners activated for this project"の部分を見ると、追加したRunnerの項目が追加されてることを確認できる。
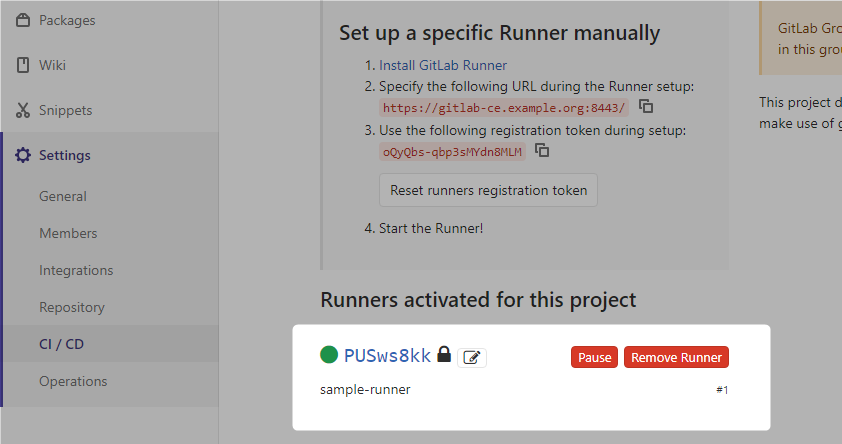
f:id:zaki-hmkc:20200313072008p:plain

追加した設定は、GitLab Runnerコンテナ内の/etc/gitlab-runner/config.tomlに作成される。これはDockerのボリューム設定によってホストOSの/opt/gitlab-runner/config/config.tomlになっている。

concurrent = 1
check_interval = 0

[session_server]
  session_timeout = 1800

[[runners]]
  name = "sample-runner"
  url = "https://gitlab-ce.example.org:8443/"
  token = "PUSws8kkxEnz5Qn4npye"
  executor = "shell"
  [runners.custom_build_dir]
  [runners.cache]
    [runners.cache.s3]
    [runners.cache.gcs]

Runnerお試し

こんなファイルを用意

---
stages:
  - runner-test

job01:
  stage: runner-test
  script:
    - id
    - uname -r
    - ps auxwwf
    - hostname
    - ls -alF

pushする

% git add .gitlab-ci.yml
% git commit -m "add: gitlab-ciお試し"
% git push

すると、GitLab CE上でpipelineが動き始める。 (中身はコマンド実行するだけなのですぐ完了する)

f:id:zaki-hmkc:20200313075702p:plain

statusの列("passed"などのリザルト)はリンクになってて、内容を確認できる。
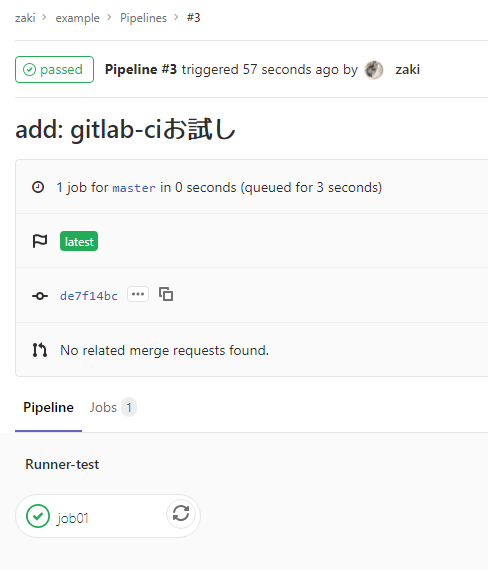
f:id:zaki-hmkc:20200313080002p:plain

jobの詳細で、CIで実行された処理の出力を確認できる。

f:id:zaki-hmkc:20200313080107p:plain

$ id
 uid=999(gitlab-runner) gid=999(gitlab-runner) groups=999(gitlab-runner)
 $ uname -r
 3.10.0-1062.9.1.el7.x86_64
 $ ps auxwwf
 USER        PID %CPU %MEM    VSZ   RSS TTY      STAT START   TIME COMMAND
 root         14  0.0  0.0  18496  1940 pts/0    Ss+  22:09   0:00 bash
 root          1  0.0  0.0    164     4 ?        Ss   22:08   0:00 /usr/bin/dumb-init /entrypoint run --user=gitlab-runner --working-directory=/home/gitlab-runner
 root          6  0.1  0.5 137040 19668 ?        Ssl  22:08   0:02 gitlab-runner run --user=gitlab-runner --working-directory=/home/gitlab-runner
 root        109  0.0  0.0  49260  1628 ?        S    22:41   0:00  \_ su -s /bin/bash gitlab-runner -c bash --login
 gitlab-+    110  0.0  0.0   9908  1544 ?        Ss   22:41   0:00      \_ bash --login
 gitlab-+    114  0.0  0.0  10040   908 ?        S    22:41   0:00          \_ bash --login
 gitlab-+    118  0.0  0.0  34392  1528 ?        R    22:41   0:00              \_ ps auxwwf
 $ hostname
 365f57ba0691
 $ ls -alF
 total 4
 drwxrwxr-x. 3 gitlab-runner gitlab-runner  57 Mar 12 22:41 ./
 drwxrwxr-x. 4 gitlab-runner gitlab-runner  40 Mar 12 22:41 ../
 drwxrwxr-x. 6 gitlab-runner gitlab-runner 113 Mar 12 22:41 .git/
 -rw-rw-r--. 1 gitlab-runner gitlab-runner 136 Mar 12 22:41 .gitlab-ci.yml
 -rw-rw-r--. 1 gitlab-runner gitlab-runner   0 Mar 12 22:41 README.md

こんな感じで、gitlab-runner register時にshellを指定しているので、「Runnerが動いてるホスト上でshell実行」されていることが確認できた。
今回Runner自体をコンテナで実行してるので、「Runnerが動いているホスト」が、Runner自身のコンテナ内になってる。


全体のdocker-compose.yml

---
version: '3'
services:
  gitlab-ce.example.org:
    image: gitlab/gitlab-ce:12.7.4-ce.0
    hostname: gitlab-ce.example.org
    restart: always
    ports:
      - "8443:8443"
      - "25000:25000"
    environment:
      GITLAB_OMNIBUS_CONFIG: "external_url 'https://gitlab-ce.example.org:8443'; nginx['listen_port']=8443; gitlab_rails['registry_enabled']=true; registry_external_url 'https://gitlab-ce.example.org:25000'"
    volumes:
      - /opt/gitlab-reg/config:/etc/gitlab:Z
      - /opt/gitlab-reg/logs:/var/log/gitlab:Z
      - /opt/gitlab-reg/data:/var/opt/gitlab:Z
      - /opt/gitlab-reg/registry:/var/opt/gitlab/gitlab-rails/shared/registry:Z
      - /opt/gitlab-cert:/etc/gitlab/ssl
  gitlab-runner:
    image: gitlab/gitlab-runner:v12.7.1
    restart: always
    volumes:
      - /opt/gitlab-runner/config:/etc/gitlab-runner:Z
      - /var/run/docker.sock:/var/run/docker.sock
      - /opt/gitlab-cert:/etc/gitlab-runner/certs

shellじゃなくてdockerについてはこちら
(dindでさらにコンテナ間通信がcompose管理外の構成)

zaki-hmkc.hatenablog.com

dind(Docker in Docker)については、ホストの/var/run/docker.sockをボリューム設定で共用してる関係で、何も問題なかった。


というかdocker run -p host-port:container-portしたコンテナ、ホストOS外のリモートからの接続は問題ないけど、同じホスト上の別のDockerコンテナからは「ホストのアドレス:port」だと接続できないのね…知らなかった…(というか、何かセオリーあるのかな)

"GitLab CE contaienr"は-pを使ってホストOSからのポートフォワードを設定 f:id:zaki-hmkc:20200313215845p:plain
この設定でリモートからのアクセスが可能になる。 f:id:zaki-hmkc:20200313215933p:plain

でもこの構成だと、別のコンテナからホストOSのIPアドレス:ポート番号のアクセスができなかった。(コンテナ間通信はdocker networkの設定でイケる) f:id:zaki-hmkc:20200313215801p:plain


参考文献はGitLab実践ガイド

PDF版はインプレスで購入すればOK

book.impress.co.jp