HashiCorp VaultにルートCAや中間CAを持たせ、ACMEサーバーとして動作させることもできると少し前に聞いてて、間が空いてしまったけどローカル環境でお試し。
ドキュメントのチュートリアル見れば全部載ってるけど、流れとしては以下の通り。
- CA作成
- 中間CA作成
- ACMEの有効化
これでACMEクライアントを使って証明書を発行できる。
手元の環境ではACMEクライアント内蔵のwebサーバーであるCaddyと、AnsibleのACMEモジュールで確認。
※ 本エントリは巷で流行って(?)いる「Let's EncryptなどのパブリックなCAで取得した証明書をHashiCorp Vaultに保存する」ではなく、HashiCorp VaultをACMEサーバーとして利用する、という内容。
基本チュートリアルの「Enable PKI secrets engine」に載っているシェルスクリプトで実行しているコマンドにすべて凝縮されているので、その通り実行すればOK
なお、文中にでてくる「小細工せずに」とあるのは、ストレートに実行するにはそこに記載されたコマンドを実行して出力も書いた通りだけど、実際は出力の一部を次のコマンドの入力に使うので出力の指定+ファイルへのリダイレクトを実行した方が効率的、というもの。その場合の小細工したコマンドも併記している。
小細工せずに実行して、必要な部分をファイルへコピペしてももちろんOK
※ 数日かけてローカル環境で実際に叩いて検証したコマンドを切った貼ったした後にexample.orgに置換しているので、辻褄があってないところがあったらスミマセン。あとTTL関連は適当。
ルートCA作成
pkiシークレットエンジンの有効化
ここではpki_sampleという名前で作成。
/ $ vault secrets enable -path=pki_sample pki
Success! Enabled the pki secrets engine at: pki_sample/
/ $ vault secrets list
Path           Type         Accessor              Description
----           ----         --------              -----------
cubbyhole/     cubbyhole    cubbyhole_5385003f    per-token private secret storage
identity/      identity     identity_ca6a05cb     identity store
kv/            kv           kv_fa90d55f           n/a
pki_sample/    pki          pki_b56089fe          n/a
sys/           system       system_55b426c6       system endpoints used for control, policy and debugging
/ $
ルートCAの作成
下記コマンドで有効化したpkiシークレットエンジンへ証明書を作成する。
vault write pki_sample/root/generate/internal \
   common_name="ca.example.org" \
   issuer_name="ca.example.org" \
   ttl=87600h
実行例。
~ $ vault write pki_sample/root/generate/internal \
>    common_name="ca.example.org" \
>    issuer_name="ca.example.org" \
>    ttl=87600h
WARNING! The following warnings were returned from Vault:

  * This mount hasn't configured any authority information access (AIA)
  fields; this may make it harder for systems to find missing certificates
  in the chain or to validate revocation status of certificates. Consider
  updating /config/urls or the newly generated issuer with this information.

Key              Value
---              -----
certificate      -----BEGIN CERTIFICATE-----
MIIDNTCCAh2gAwIBAgIUMLEDwyg4EEW97IwZPrw+/gIF5ekwDQYJKoZIhvcNAQEL
........
........
-----END CERTIFICATE-----
expiration       1777966741
issuer_id        7dedafab-6f0e-97bb-9e05-7fe8c302de93
issuer_name      ca.example.org
issuing_ca       -----BEGIN CERTIFICATE-----
MIIDNTCCAh2gAwIBAgIUMLEDwyg4EEW97IwZPrw+/gIF5ekwDQYJKoZIhvcNAQEL
........
........
-----END CERTIFICATE-----
key_id           c531e806-57aa-de2b-f77e-a0f8e94ec9db
key_name         n/a
serial_number    30:b1:03:c3:...............................................
~ $
作成した内容はweb UIでも確認できる。
また、クライアントへインストールするCA関連はUIからダウンロードもできる。

CAの証明書はvault writeでの作成時に-field=certificateを付けるとstdoutが証明書データのみになるので、ファイルにリダイレクトしても良い。(チュートリアルのスクリプト内はこの方式)
vault write -field=certificate pki_sample/root/generate/internal \
   common_name="ca.example.org" \
   issuer_name="ca.example.org" \
   ttl=87600h > root_ca.crt
URL設定
vault write pki_sample/config/cluster \
   path=https://vault.k3s.example.org/v1/pki \
   aia_path=https://vault.k3s.example.org/v1/pki

vault write pki_sample/config/urls \
   issuing_certificates={{cluster_aia_path}}/issuer/{{issuer_id}}/der \
   crl_distribution_points={{cluster_aia_path}}/issuer/{{issuer_id}}/crl/der \
   ocsp_servers={{cluster_path}}/ocsp \
   enable_templating=true
実行結果
~ $ vault write pki_sample/config/cluster \
>    path=https://vault.k3s.example.org/v1/pki \
>    aia_path=https://vault.k3s.example.org/v1/pki
Key         Value
---         -----
aia_path    https://vault.k3s.example.org/v1/pki
path        https://vault.k3s.example.org/v1/pki


~ $ vault write pki_sample/config/urls \
>    issuing_certificates={{cluster_aia_path}}/issuer/{{issuer_id}}/der \
>    crl_distribution_points={{cluster_aia_path}}/issuer/{{issuer_id}}/crl/der \
>    ocsp_servers={{cluster_path}}/ocsp \
>    enable_templating=true
Key                              Value
---                              -----
crl_distribution_points          [{{cluster_aia_path}}/issuer/{{issuer_id}}/crl/der]
delta_crl_distribution_points    []
enable_templating                true
issuing_certificates             [{{cluster_aia_path}}/issuer/{{issuer_id}}/der]
ocsp_servers                     [{{cluster_path}}/ocsp]
~ $
この辺のコマンドの効果はよくわかってない。。
{{cluster_aia_path}}とか、プレースホルダ的な設定で…いいのかな。
あとドキュメントにはルートCAのpkiにロール設定を行ってるけど、実行し忘れ(テヘペロ
中間CA作成
クローズドで小規模なローカル環境で中間CAって必要なのかなと思いつつも、チュートリアルの通り流れで作ってみる。
中間CAはルートCAとは別途pkiシークレットエンジンを作成。(箱は別物、ということ)
~ $ vault secrets enable -path=pki_sample_int pki
Success! Enabled the pki secrets engine at: pki_sample_int/
CSR作成
小細工せずに実行するには下記コマンド。
vault write pki_sample_int/intermediate/generate/internal \
   common_name="ca.example.org Intermediate Authority" \
   issuer_name="learn-intermediate"
実行結果はこの通り。
~ $ vault write pki_sample_int/intermediate/generate/internal \
>    common_name="ca.example.org Intermediate Authority" \
>    issuer_name="learn-intermediate"
WARNING! The following warnings were returned from Vault:

  * This mount hasn't configured any authority information access (AIA)
  fields; this may make it harder for systems to find missing certificates
  in the chain or to validate revocation status of certificates. Consider
  updating /config/urls or the newly generated issuer with this information.
  Since this certificate is an intermediate, it might be useful to regenerate
  this certificate after fixing this problem for the root mount.

  * Endpoint ignored these unrecognized parameters: [issuer_name]

Key       Value
---       -----
csr       -----BEGIN CERTIFICATE REQUEST-----
MIICcjCCAVoCAQAwLTErMCkGA1UEAxMibGFiLmpwLXouanAgSW50ZXJtZWRpYXRl
........
........
-----END CERTIFICATE REQUEST-----
key_id    0e1b0675-8249-d2cd-3fa3-d5d06e1f7995
~ $
実際はこの出力のうちcsrのデータを次コマンドの入力に使うので、-field=csr指定でcsrのみ出力するようにし、ファイルへ出力する。
vault write -field=csr pki_sample_int/intermediate/generate/internal \
   common_name="ca.example.org Intermediate Authority" \
   issuer_name="learn-intermediate" > /tmp/pki_intermediate.csr
ルートCAで署名し証明書作成
ファイルに出力した前述のcsrデータをcsr=で指定し、ルートCAのpkiに対して以下コマンドを実行する。
以下は小細工無しバージョン。(このコマンドも一部出力を次の入力に使用するので、ファイル出力の小細工をした方が便利。後述)
vault write  pki_sample/root/sign-intermediate \
   issuer_ref="ca.example.org" \
   csr=@/tmp/pki_intermediate.csr \
   format=pem_bundle
実行するとこの通り。
~ $ vault write  pki_sample/root/sign-intermediate \
>    issuer_ref="ca.example.org" \
>    csr=@/tmp/pki_intermediate.csr \
>    format=pem_bundle
WARNING! The following warnings were returned from Vault:

  * the signed intermediary CA certificate's notAfter was truncated to the
  issuer's notAfter

Key              Value
---              -----
ca_chain         [-----BEGIN CERTIFICATE-----
MIIEZDCCA0ygAwIBAgIUJyuKUhPylHrnecmm0pFa1WUDe+UwDQYJKoZIhvcNAQEL
........
........
-----END CERTIFICATE----- -----BEGIN CERTIFICATE-----
MIIDNTCCAh2gAwIBAgIUMLEDwyg4EEW97IwZPrw+/gIF5ekwDQYJKoZIhvcNAQEL
........
........
-----END CERTIFICATE-----]
certificate      -----BEGIN CERTIFICATE-----
MIIEZDCCA0ygAwIBAgIUJyuKUhPylHrnecmm0pFa1WUDe+UwDQYJKoZIhvcNAQEL
........
........
-----END CERTIFICATE-----
-----BEGIN CERTIFICATE-----
MIIDNTCCAh2gAwIBAgIUMLEDwyg4EEW97IwZPrw+/gIF5ekwDQYJKoZIhvcNAQEL
........
........
-----END CERTIFICATE-----
expiration       1777966741
issuing_ca       -----BEGIN CERTIFICATE-----
MIIDNTCCAh2gAwIBAgIUMLEDwyg4EEW97IwZPrw+/gIF5ekwDQYJKoZIhvcNAQEL
........
........
-----END CERTIFICATE-----
serial_number    27:2b:8a:52:...............................................
前述のコマンド同様に、この出力のうちcertificateの値を次の入力に使うので、-field=certificate指定でcertificateのみ出力するようにし、ファイルへ書き出す。
vault write -field=certificate pki_sample/root/sign-intermediate \
   issuer_ref="ca.example.org" \
   csr=@/tmp/pki_intermediate.csr \
   format=pem_bundle > /tmp/intermediate.cert.pem
中間CAをVaultへ登録
vault write pki_sample_int/intermediate/set-signed certificate=@/tmp/intermediate.cert.pem
実行結果
~ $ vault write pki_sample_int/intermediate/set-signed certificate=@/tmp/intermediate.cert.pem
WARNING! The following warnings were returned from Vault:

  * This mount hasn't configured any authority information access (AIA)
  fields; this may make it harder for systems to find missing certificates
  in the chain or to validate revocation status of certificates. Consider
  updating /config/urls or the newly generated issuer with this information.

Key                 Value
---                 -----
existing_issuers    <nil>
existing_keys       <nil>
imported_issuers    [67af1b27-b941-47ba-6da5-97c0d171d465 812e436b-944f-b670-fcf4-5921f2a217d1]
imported_keys       <nil>
mapping             map[67af1b27-b941-47ba-6da5-97c0d171d465:5fe69f53-bb2f-fc39-328f-0fb1133a737d 812e436b-944f-b670-fcf4-5921f2a217d1:]
~ $
URL設定
ここはルートCAの場合と同様。
vault write pki_sample_int/config/cluster \
   path=http://vault.k3s.example.org/v1/pki_sample_int \
   aia_path=http://vault.k3s.example.org/v1/pki_sample_int

vault write pki_sample_int/config/urls \
   issuing_certificates={{cluster_aia_path}}/issuer/{{issuer_id}}/der \
   crl_distribution_points={{cluster_aia_path}}/issuer/{{issuer_id}}/crl/der \
   ocsp_servers={{cluster_path}}/ocsp \
   enable_templating=true
実行結果
~ $ vault write pki_sample_int/config/cluster \
>    path=http://vault.k3s.example.org/v1/pki_sample_int \
>    aia_path=http://vault.k3s.example.org/v1/pki_sample_int
Key         Value
---         -----
aia_path    http://vault.k3s.example.org/v1/pki_sample_int
path        http://vault.k3s.example.org/v1/pki_sample_int
~ $

~ $ vault write pki_sample_int/config/urls \
>    issuing_certificates={{cluster_aia_path}}/issuer/{{issuer_id}}/der \
>    crl_distribution_points={{cluster_aia_path}}/issuer/{{issuer_id}}/crl/der \
>    ocsp_servers={{cluster_path}}/ocsp \
>    enable_templating=true
Key                              Value
---                              -----
crl_distribution_points          [{{cluster_aia_path}}/issuer/{{issuer_id}}/crl/der]
delta_crl_distribution_points    []
enable_templating                true
issuing_certificates             [{{cluster_aia_path}}/issuer/{{issuer_id}}/der]
ocsp_servers                     [{{cluster_path}}/ocsp]
/ $
ロール設定
ポリシー設定を行う。
vault write pki_sample_int/roles/lab \
   issuer_ref="$(vault read -field=default pki_sample_int/config/issuers)" \
   allow_any_name=true \
   max_ttl="720h" \
   no_store=false
実行結果
/ $ vault write pki_sample_int/roles/lab \
>    issuer_ref="$(vault read -field=default pki_sample_int/config/issuers)" \
>    allow_any_name=true \
>    max_ttl="720h" \
>    no_store=false
Key                                   Value
---                                   -----
allow_any_name                        true
allow_bare_domains                    false
allow_glob_domains                    false
allow_ip_sans                         true
allow_localhost                       true
allow_subdomains                      false
allow_token_displayname               false
allow_wildcard_certificates           true
allowed_domains                       []
allowed_domains_template              false
allowed_other_sans                    []
allowed_serial_numbers                []
allowed_uri_sans                      []
allowed_uri_sans_template             false
allowed_user_ids                      []
basic_constraints_valid_for_non_ca    false
client_flag                           true
cn_validations                        [email hostname]
code_signing_flag                     false
country                               []
email_protection_flag                 false
enforce_hostnames                     true
ext_key_usage                         []
ext_key_usage_oids                    []
generate_lease                        false
issuer_ref                            67af1b27-b941-47ba-6da5-97c0d171d465
key_bits                              2048
key_type                              rsa
key_usage                             [DigitalSignature KeyAgreement KeyEncipherment]
locality                              []
max_ttl                               720h
no_store                              false
not_after                             n/a
not_before_duration                   30s
organization                          []
ou                                    []
policy_identifiers                    []
postal_code                           []
province                              []
require_cn                            true
serial_number_source                  json-csr
server_flag                           true
signature_bits                        256
street_address                        []
ttl                                   0s
use_csr_common_name                   true
use_csr_sans                          true
use_pss                               false
/ $
チュートリアルだとallow_any_name=trueとあるのでドメイン名設定に制約がない感じだろうか?
ちなみにCA構築のチュートリアルだとallowed_domains="example.com"という指定にallow_subdomains=trueを組み合わせているので、特定のサブドメインのみに制限することもおそらくできそう。
証明書作成
ここまでの手順で、サーバー証明書発行が可能になるのでひとまず試してみる。
CLIで作成
vault write pki_sample_int/issue/lab common_name="www.lab.example.org" ttl="24h"
実行結果
/ $ vault write pki_sample_int/issue/lab common_name="www.lab.example.org" ttl="24h"
Key                 Value
---                 -----
authority_key_id    5c:f5:67:1e:...............................................
ca_chain            [-----BEGIN CERTIFICATE-----
MIIEZDCCA0ygAwIBAgIUH+DdRyPBJi0C4bqvarwWlnTpJn8wDQYJKoZIhvcNAQEL
........
........
-----END CERTIFICATE----- -----BEGIN CERTIFICATE-----
MIIDNTCCAh2gAwIBAgIUMLEDwyg4EEW97IwZPrw+/gIF5ekwDQYJKoZIhvcNAQEL
........
........
k5DsSs1XDJx0
-----END CERTIFICATE-----]
certificate         -----BEGIN CERTIFICATE-----
MIIEujCCA6KgAwIBAgIUAouPiSIHH4TWqaFDMHFsNM1ehNswDQYJKoZIhvcNAQEL
........
........
7fmglDp7UjT6l1g6vfQ=
-----END CERTIFICATE-----
expiration          1775454657
issuing_ca          -----BEGIN CERTIFICATE-----
MIIEZDCCA0ygAwIBAgIUH+DdRyPBJi0C4bqvarwWlnTpJn8wDQYJKoZIhvcNAQEL
........
........
5JmtLzl51r4B6rctXAR+RsGbaLJbPKVI
-----END CERTIFICATE-----
private_key         -----BEGIN RSA PRIVATE KEY-----
MIIEowIBAAKCAQEAqs9vOD2FyJkcv8wVXNG2ko/YRw8rn3hgYseE/S8xN7brWQOV
........
........
-----END RSA PRIVATE KEY-----
private_key_type    rsa
serial_number       02:8b:8f:89:...............................................
/ $
private_keyはおそらくこの出力でしか見れないのでコピーしておく。あとcertificateが証明書情報。
それぞれserver.key、server.crtとしてサーバーで使用できる。
httpdコンテナを使ったHTTPSアクセス例は以下。
services:
  httpd:
    image: httpd
    ports:
    - 7443:443
    volumes:
    - ~/local/src:/usr/local/apache2/htdocs/
    - ./httpd.conf:/usr/local/apache2/conf/httpd.conf
    - ./server.crt:/usr/local/apache2/conf/server.crt
    - ./server.key:/usr/local/apache2/conf/server.key
httpd.confは標準から以下の設定を加えればだいたいOK
diff --git a/httpd.conf b/httpd.conf
index 8e85126..d96721b 100644
--- a/httpd.conf
+++ b/httpd.conf
@@ -158,7 +158,7 @@ LoadModule version_module modules/mod_version.so
 #LoadModule session_dbd_module modules/mod_session_dbd.so
 #LoadModule slotmem_shm_module modules/mod_slotmem_shm.so
 #LoadModule slotmem_plain_module modules/mod_slotmem_plain.so
-#LoadModule ssl_module modules/mod_ssl.so
+LoadModule ssl_module modules/mod_ssl.so
 #LoadModule optional_hook_export_module modules/mod_optional_hook_export.so
 #LoadModule optional_hook_import_module modules/mod_optional_hook_import.so
 #LoadModule optional_fn_import_module modules/mod_optional_fn_import.so
@@ -546,7 +546,13 @@ Include conf/extra/proxy-html.conf
 #       but a statically compiled-in mod_ssl.
 #
 <IfModule ssl_module>
-SSLRandomSeed startup builtin
-SSLRandomSeed connect builtin
+Listen 443^M
+# SSLRandomSeed startup builtin
+# SSLRandomSeed connect builtin
+<VirtualHost _default_:443>
+SSLEngine on
+SSLCertificateFile "/usr/local/apache2/conf/server.crt"
+SSLCertificateKeyFile "/usr/local/apache2/conf/server.key"
+</VirtualHost>
 </IfModule>
全体の設定は以下
ACMEで作成
ここから本番
有効化設定
デフォルトではACMEは無効なので、有効化する。
また、ACMEで使用するヘッダを許可する設定を投入。
vault secrets tune \
      -passthrough-request-headers=If-Modified-Since \
      -allowed-response-headers=Last-Modified \
      -allowed-response-headers=Location \
      -allowed-response-headers=Replay-Nonce \
      -allowed-response-headers=Link \
      pki_sample_int
vault write pki_sample_int/config/acme enabled=true
実行結果
/ $ vault secrets tune \
>       -passthrough-request-headers=If-Modified-Since \
>       -allowed-response-headers=Last-Modified \
>       -allowed-response-headers=Location \
>       -allowed-response-headers=Replay-Nonce \
>       -allowed-response-headers=Link \
>       pki_sample_int
Success! Tuned the secrets engine at: pki_sample_int/
/ $
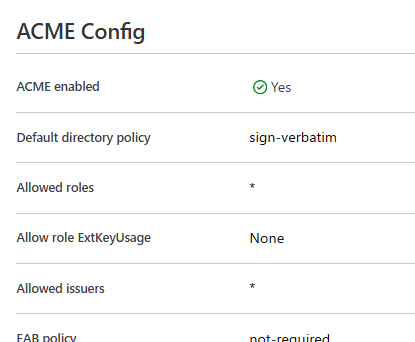
/ $ vault write pki_sample_int/config/acme enabled=true
Key                         Value
---                         -----
allow_role_ext_key_usage    false
allowed_issuers             [*]
allowed_roles               [*]
default_directory_policy    sign-verbatim
dns_resolver                n/a
eab_policy                  not-required
enabled                     true
max_ttl                     2160h
/ $
有効になるとweb UIの「Configuration」のページでも確認できる。
CaddyのACMEクライアントで証明書作成
CaddyはACMEクライアント内蔵のwebサーバー。
2021年のアドカレでNetBoxをHTTPSアクセスできるようにするために使う記事を書いてたりしてる。
で、やることは基本チュートリアルの通り。
ただし、HashiCorp Vault自体を自前CAで署名したサーバー証明書で運用している場合は、CAを指定して起動する必要がある。(見落としかもしれないけど、TLS検証を無視する設定は見当たらなかった)
設定はこの通りで、ルートCAを/tmp/ca.crtに配置してデプロイ。(お試しなので仮置きのパス)
{
  acme_ca https://vault.k3s.example.org/v1/pki_sample_int/acme/directory
  acme_ca_root /tmp/ca.crt
}

caddy-web.lab.example.org {
  root * /srv
  file_server {
    browse
  }
}
ちなみにcompose.yamlは以下で、ホストOSの~/local/srcをweb公開する構成。
80/TCPについてはHTTP-01チャレンジのために空けている。
services:
  web:
    image: caddy
    ports:
    - 8443:443
    - 80:80
    volumes:
    - ~/local/src:/srv
    - $PWD/Caddyfile:/etc/caddy/Caddyfile
    - $PWD/ca.crt:/tmp/ca.crt
エラーログサンプル
Vaultが自己署名CAで作ったサーバー証明書を使っている場合、ACMEサーバーのHTTPSアクセスで証明書エラー
web-1  | {"level":"warn","ts":1775770112.956369,"msg":"HTTP request failed; retrying","url":"https://vault.k3s.example.org/v1/pki_sample_int/acme/directory","error":"performing request: Get \"https://vault.k3s.example.org/v1/pki_sample_int/acme/directory\": tls: failed to verify certificate: x509: certificate signed by unknown authority"}
web-1  | {"level":"error","ts":1775770112.9565053,"logger":"tls.obtain","msg":"could not get certificate from issuer","identifier":"caddy-web.lab.example.org","issuer":"vault.k3s.example.org-v1-pki_sample_int-acme-directory","error":"registering account [] with server: provisioning client: performing request: Get \"https://vault.k3s.example.org/v1/pki_sample_int/acme/directory\": tls: failed to verify certificate: x509: certificate signed by unknown authority"}
ちなみにチュートリアルだとVaultはHTTPSでなくHTTPアクセスの構成になってるが、実際に試すとこの通りエラー
zaki@cloud-dev2:~/local/src/docker/caddy$ docker compose logs web -f
web-1  | {"level":"info","ts":1775770379.4582226,"logger":"tls.obtain","msg":"obtaining certificate","identifier":"www.lab.example.org"}
web-1  | {"level":"error","ts":1775770379.4586291,"logger":"tls.obtain","msg":"could not get certificate from issuer","identifier":"www.lab.example.org","issuer":"vault.k3s.example.org-v1-pki_sample_int-acme-directory","error":"http://vault.k3s.example.org/v1/pki_sample_int/acme/directory: insecure CA URL (HTTPS required for non-internal CA)"}
web-1  | {"level":"error","ts":1775770379.458688,"logger":"tls.obtain","msg":"will retry","error":"[www.lab.example.org] Obtain: http://vault.k3s.example.org/v1/pki_sample_int/acme/directory: insecure CA URL (HTTPS required for non-internal CA)","attempt":1,"retrying_in":60,"elapsed":0.00054233,"max_duration":2592000}
また、HTTP-01チャレンジを行うので、80/TCPが空いてる必要がある。空いてなければ(Vaultから80/TCPでアクセスできなければ)この通りエラーになる。
web-1  | {"level":"error","ts":1775771020.4513772,"msg":"challenge failed","identifier":"caddy-web.lab.example.org","challenge_type":"http-01","problem":{"type":"urn:ietf:params:acme:error:incorrectResponse","title":"","detail":"Response received didn't match the challenge's requirements: error validating http-01 challenge 21b9ed31-0711-a5f0-f47a-857d74b37066-http-01: The server could not connect to validation target: http-01: failed to fetch path http://caddy-web.lab.example.org/.well-known/acme-challenge/FeJElU6E2yJCiLjmjCVyXNP7u1H2: Get \"http://caddy-web.lab.example.org/.well-known/acme-challenge/FeJElU6E2yJCiLjmjCVyXNP7u1H2\": dial tcp 192.168.0.16:80: connect: no route to host; this may occur if the validation target was misconfigured: check that challenge responses are available at the required locations and retry.", ... }}

web-1  | {"level":"error","ts":1775771020.4516823,"logger":"tls.obtain","msg":"could not get certificate from issuer","identifier":"caddy-web.lab.example.org","issuer":"vault.k3s.example.org-v1-pki_sample_int-acme-directory","error":"HTTP 400 urn:ietf:params:acme:error:incorrectResponse - Response received didn't match the challenge's requirements: error validating http-01 challenge 21b9ed31-0711-a5f0-f47a-857d74b37066-http-01: The server could not connect to validation target: http-01: failed to fetch path http://caddy-web.lab.example.org/.well-known/acme-challenge/FeJElU6E2yJCiLjmjCVyXNP7u1H2: Get \"http://caddy-web.lab.example.org/.well-known/acme-challenge/FeJElU6E2yJCiLjmjCVyXNP7u1H2\": dial tcp 192.168.0.16:80: connect: no route to host; this may occur if the validation target was misconfigured: check that challenge responses are available at the required locations and retry."}
Ansible
Ansibleのacme_certificateモジュールで証明書作成できる。
以前書いた下記エントリで使用したプレイブックはそのまま使用可能(若干バグがあったので修正したけどw)
Let's Encryptの場合のACMEディレクトリは「https://acme-v02.api.letsencrypt.org/directory」だが、ここをプライベート環境のVaultのURLに置き換えれば動作する。具体的には「https://vault.k3s.example.org/v1/pki_sample_int/acme/directory」
また、Caddyと異なり証明書検証をオフにするオプションvalidate_certsがあるのでCAを持たせる必要はない。
community.crypto.openssl_privatekeyモジュール実行で下記エラーが出る場合はpython3-cryptographyをdnfで入れればOK
fatal: [192.168.0.235]: FAILED! =>
    changed: false
    msg: Failed to import the required Python library (cryptography >= 3.3) on fedora-dev's
        Python /usr/bin/python3.14. Please read the module documentation and install it
        in the appropriate location. If the required library is installed, but Ansible
        is using the wrong Python interpreter, please consult the documentation on ansible_python_interpreter
既存のCAをインポートする場合
前述の手順はCAを新規作成するものだが、opensslで作成した自前のCAですでに運用しているような場合でも、CAのファイルをVaultへインポートして、ACMEクライアントから証明書作成に対応することもできる。
実際はこっちのケースが多いのかな?
ここではpki_labというpkiシークレットエンジンを作成。
/ $ vault secrets enable -path=pki_lab pki
Success! Enabled the pki secrets engine at: pki_lab/
既存のCAの秘密鍵と証明書のファイルを/tmp/ca_bundle.pemに用意した場合、下記コマンドでインポートできる。
なおca_bundle.pemの内容は「秘密鍵ファイル」+「証明書ファイル」を単純に結合すれば良い。
### ファイル結合
cat ca.key ca.crt > /tmp/ca_bundle.pem

### ホストOS上からvaultコンテナ内に出力なら以下
cat ca.key ca.crt | kubectl exec -n vault -i vault-0 -- sh -c 'cat - > /tmp/ca_bundle.pem'
/ $ vault write pki_lab/config/ca pem_bundle=@/tmp/ca_bundle.pem
WARNING! The following warnings were returned from Vault:

  * Warning 1 during CRL rebuild: warning from local CRL rebuild:
  Issuer equivalency set with associated keys lacked an issuer with CRL
  Signing KeyUsage; refusing to rebuild CRL for this group of issuers:
  37897a73-f513-d12e-f526-70245b18a1e4

  * This mount hasn't configured any authority information access (AIA)
  fields; this may make it harder for systems to find missing certificates
  in the chain or to validate revocation status of certificates. Consider
  updating /config/urls or the newly generated issuer with this information.

Key                 Value
---                 -----
existing_issuers    <nil>
existing_keys       <nil>
imported_issuers    [37897a73-f513-d12e-f526-70245b18a1e4]
imported_keys       [ab596d92-e32b-eeb5-e0c4-e7aa27be514c]
mapping             map[37897a73-f513-d12e-f526-70245b18a1e4:ab596d92-e32b-eeb5-e0c4-e7aa27be514c]
あとの手順はすべて前述の内容と同様。
URL設定
vault write pki_lab/config/cluster \
   path=https://vault.k3s.example.org/v1/pki_lab \
   aia_path=https://vault.k3s.example.org/v1/pki_lab
vault write pki_lab/config/urls \
   issuing_certificates={{cluster_aia_path}}/issuer/{{issuer_id}}/der \
   crl_distribution_points={{cluster_aia_path}}/issuer/{{issuer_id}}/crl/der \
   ocsp_servers={{cluster_path}}/ocsp \
   enable_templating=true
実行結果
/ $ vault write pki_lab/config/cluster \
>    path=https://vault.k3s.example.org/v1/pki_lab \
>    aia_path=https://vault.k3s.example.org/v1/pki_lab
Key         Value
---         -----
aia_path    https://vault.k3s.example.org/v1/pki_lab
path        https://vault.k3s.example.org/v1/pki_lab
/ $
/ $ vault write pki_lab/config/urls \
>    issuing_certificates={{cluster_aia_path}}/issuer/{{issuer_id}}/der \
>    crl_distribution_points={{cluster_aia_path}}/issuer/{{issuer_id}}/crl/der \
>    ocsp_servers={{cluster_path}}/ocsp \
>    enable_templating=true
Key                              Value
---                              -----
crl_distribution_points          [{{cluster_aia_path}}/issuer/{{issuer_id}}/crl/der]
delta_crl_distribution_points    []
enable_templating                true
issuing_certificates             [{{cluster_aia_path}}/issuer/{{issuer_id}}/der]
ocsp_servers                     [{{cluster_path}}/ocsp]
/ $
中間CA
おなじように。
ここではpki_lab_intというpkiシークレットエンジンで実行。
/ $ vault secrets enable -path=pki_lab_int pki
Success! Enabled the pki secrets engine at: pki_lab_int/
※ 中間CAの有効期限が切れた場合、この中間CAの作成から後述の「登録」までを再実行する。またデフォルトissueの更新を vault write pki_lab_int/config/issuers default=<対象のIssuer ID> で行う。
CSR作成
vault write -field=csr pki_lab_int/intermediate/generate/internal \
   common_name="nijigasaki.jp-z.jp Intermediate Authority" \
   issuer_name="njgk-intermediate" > /tmp/pki_lab_intermediate.csr
CAで署名
vault write -field=certificate pki_lab/root/sign-intermediate \
   issuer_ref="$(vault read -field=default pki_lab/config/issuers)" \
   csr=@/tmp/pki_lab_intermediate.csr \
   format=pem_bundle > /tmp/lab_intermediate.cert.pem
登録
vault write pki_lab_int/intermediate/set-signed certificate=@/tmp/lab_intermediate.cert.pem
URL設定
vault write pki_lab_int/config/cluster \
   path=http://vault.k3s.example.org/v1/pki_lab_int \
   aia_path=http://vault.k3s.example.org/v1/pki_lab_int
vault write pki_lab_int/config/urls \
   issuing_certificates={{cluster_aia_path}}/issuer/{{issuer_id}}/der \
   crl_distribution_points={{cluster_aia_path}}/issuer/{{issuer_id}}/crl/der \
   ocsp_servers={{cluster_path}}/ocsp \
   enable_templating=true
ロール設定
vault write pki_lab_int/roles/lab \
   issuer_ref="$(vault read -field=default pki_lab_int/config/issuers)" \
   allow_any_name=true \
   max_ttl="720h" \
   no_store=false
ACME有効化
vault secrets tune \
      -passthrough-request-headers=If-Modified-Since \
      -allowed-response-headers=Last-Modified \
      -allowed-response-headers=Location \
      -allowed-response-headers=Replay-Nonce \
      -allowed-response-headers=Link \
      pki_lab_int
vault write pki_lab_int/config/acme enabled=true
これでACMEクライアントから証明書作成できるようになる。
Let's EncryptのようなパブリックなCAとグローバルIPでアクセスできるホストでなく、ローカルネットワーク内に閉じたHashiCorp VaultとVMで、ACMEを使ったサーバー証明書作成を使った構築自動化はちょっと感動。
クライアントの証明書ストアに自前のCAを入れる必要はあるけどそれが済んでいれば、証明書エラーにならないサーバー構築をシュッとできるのは良いね。いままでは心を込めたopensslコマンド実行だったからね。笑
参考
環境
- HashiCorp Vault 1.21.2 (on Kubernetes)
- K3s v1.34.3+k3s1
- Caddy v2.10.0 (on Docker)
- Ansible Core 2.20.4 / community.crypto 3.1.1
使用ドメイン(sample)は以下
| FQDN | 用途 |
|---|---|
vault.k3s.example.org |
HashiCorp VaultのFQDN |
www.lab.example.org |
httpdでデプロイするwebサーバー |
caddy-web.lab.example.org |
Caddyでデプロイするwebサーバー |
