先日構築したフリー版CML2.8.1で、Cisco IOSに慣れるためにここで作った仮想ルーターにCMLの外からSSH接続するための設定についてのメモ。
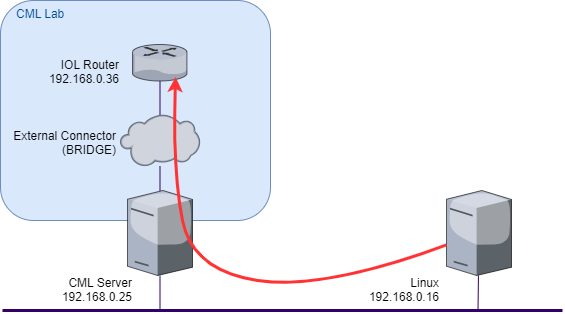
構成としてはこんなイメージで、ルーターはCML本体と同じネットワークに繋がる。(External Connectorの位置はブリッジなので微妙かもしれんが)
準備:ツナガルラボの作成とノードの配置
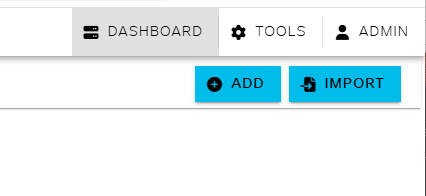
CMLのダッシュボードの「+ADD」を押下すると新しいラボが作成される。
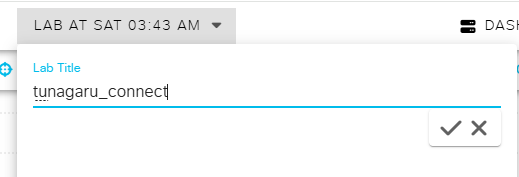
作成直後はラボ名が作成日付になってるので、分かりやすい名前に変更する。
ラボ名部分を押下し、サンプルとしてtunagaru_connectと入力。
仮想ルーターの配置
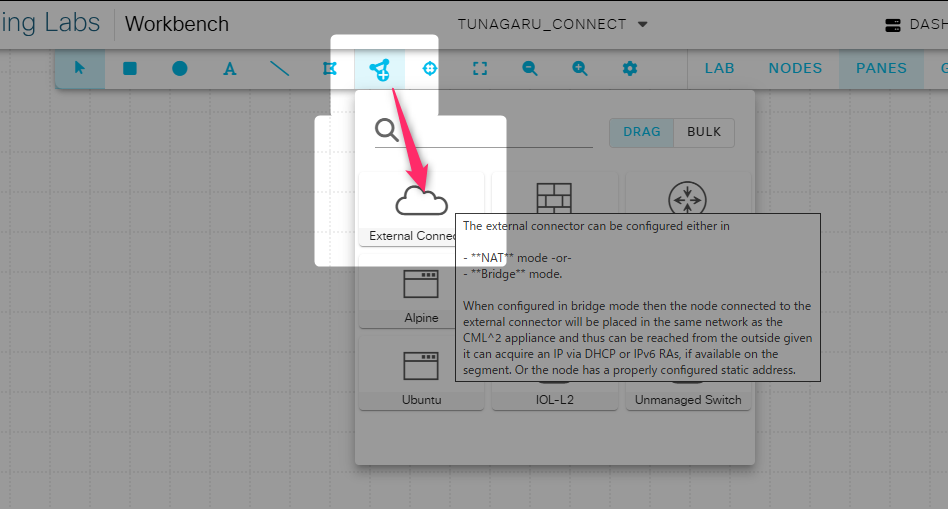
仮想ルーターを作成するには、ツールバーの「Add Nodes」を押下し、「IOL」をクリックし、メイン画面へD&Dすると配置される。

ちなみにIOLはCisco IOS-XEを実装した仮想ルーターらしい。LはLinux?
外部コネクタ(名称…?)の配置
同様に、外部からの接続に使うための「External Connector」も追加する。
ノード間をリンク
配置した仮想ルーターと外部コネクタをリンクするには、どちらか片方のノードアイコンを右クリックし「Add Link」を選択するとリンク用の線を繋ぐモードになるので、もう片方のノードアイコンまで繋げる。

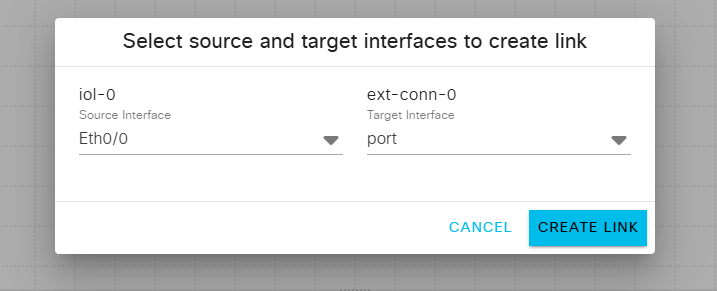
すると各ノードのどのインタフェースで接続するかのダイアログが開くので、必要に応じて選択(デフォルトでOK)し、「CREATE LINK」を押下すれば、ノード間がケーブルで接続された状態になる。
これで準備OK
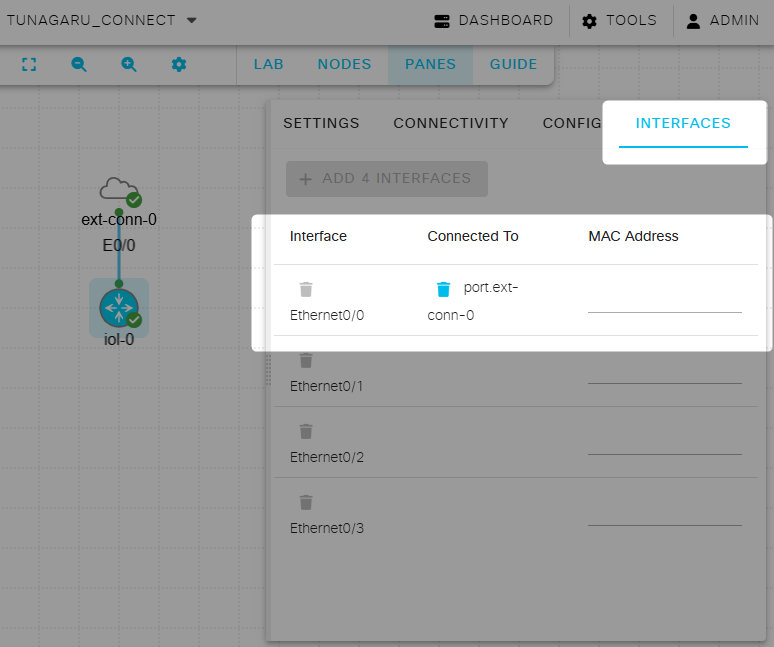
ノード間リンク接続時にどのインタフェースで接続したかは、ノードアイコンを選択すると右側にでてくるノード情報の「INTERFACES」で確認できる。
ラボの起動
ノード毎に起動(電源ON)もできるが、ツールバーの「LAB > Start Lab」で一括起動できる。
これで仮想ルーターと外部コネクタが起動する。

コンソール接続
SSH接続できるようにする設定を行うために、そもそも仮想ルーターを操作する必要があり、CLIでアクセスするにはCMLのコンソールを使う。
アクセス方法は2通り。
webのコンソールから接続
CMLのweb画面で接続する方法。操作が簡単なので気軽にCLIを試せる。
体感だけど接続がタイムアウトしたあとに操作を受け付けず、復帰までEnter連打したりゴチャゴチャするはめになるのがちょっと難点
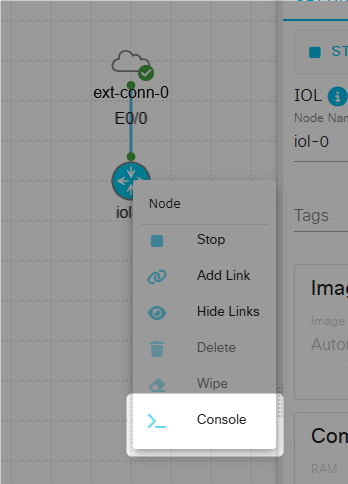
コンソールに接続するには、対象ノードの右クリックメニューの「Console」を選択。
すると画面下部にコンソールの領域が表示されるので、中央の「>_ OPEN CONSOLE」を押下。

これでコンソールに接続される。

CML(ホストOS)のコンソールから接続
ホストOSにadminユーザーでSSH接続しそこからアクセスする、というもの。
zaki@cloud-dev2:~$ ssh admin@192.168.0.25
admin@192.168.0.25's password:

****
CML2 Console Server
Copyright (c) 2019-2024 Cisco Systems, Inc. and/or its affiliates
****

tab completion works
list available nodes and node labels / IDs with "list"
it's also possible to do a "open /Lab at Wed 22:21 PM/iosv-0/0" command
or to directly connect via UUID "connect 697bb5b8-7181-49c5-8e85-540eacf9deac"
(e.g. lab name followed by node name and line number

consoles>
labs入力でラボ一覧が表示される。
consoles> labs
Lab                                                                Nodes  Links
-------------------------------------------------------------------------------
tunagaru_connect                                                       2      1
sample                                                                 3      2
listでコンソール接続可能なノード一覧
consoles> list
Lab                                                            Node       Lines
-------------------------------------------------------------------------------
sample                                                        iol-0           0
sample                                                     ubuntu-0           0
tunagaru_connect                                              iol-0           0
接続したいのはtunagaru_connectのiol-0のLine0(これがよくわかってない)なので、コマンドは以下。
(/0まで必要)
consoles> open /tunagaru_connect/iol-0/0
Connecting to console for iol-0
Connected to CML terminalserver.
Escape character is '^]'.

inserthostname-here>
inserthostname-here>
これで、webの画面のコンソールと同じ出力になる。
(それぞれの画面で入力したものが連動するので、どちらか好きな方で操作すれば良い)
ルーターを抜けるにはCtrl - ]を入力し、SSHを切断するにはconsole>プロンプトでexitかquitで抜ける。
CMLを始めよう!(8.CMLホストを利用したコンソール接続)
外部からSSH接続するための設定
ルーターの操作ができるようになったので、いよいよ本番。
外部コネクタのブリッジ設定
外からCMLのラボ内のルーター(ノード)へ接続するため、外部コネクタとつながってるノードを外部(ホストOSであるCMLがつながってるネットワーク)とブリッジ接続する構成を作る。
逆方向のルーターから外部へのアクセスはブリッジ接続以外にNAT接続もあるが、それだと外部から接続できない(よね?)ので、今回はブリッジ接続で構成する。
なんだけど、実は一度起動すると変更ができない(変更する場合は「WIPE」して初期化が必要)ので、ノードを右クリックメニューの「Stop」で停止し、同じく右クリックメニューの「WIPE」で初期化する。
(または「ノード選択>ツールバーの「NODE」押下>画面下部の「WIPE」押下」の順にクリック)

これで設定変更できるようになるので、ノード選択時の右側の画面の「CONFIG」タブのConnector Selectionで「System Bridge: (bridge0)」を選択し、右クリックメニューの「Start」で再度起動する。

ちなみにWIPE機能自体は、LinuxノードなどでIPアドレスなどの設定を変更したい場合にも(内部的に初期設定に使ってるCloud-Initを反映させるため)初期化再構築で使う。
仮想ルーターのアドレス設定
ブリッジ設定の外部コネクタ経由で仮想ルーター(の外部コネクタとリンクしてるインタフェース)をCMLと同じネットワークに接続できるようになったので、このインタフェースに実際にIPアドレスを設定する。
前述の操作でコンソールに接続し、以下コマンドを実行。
これでホスト名iol-0と、IPアドレスを192.168.0.36/24がセットされる。
inserthostname-here>enable
inserthostname-here#
inserthostname-here#configure terminal
Enter configuration commands, one per line.  End with CNTL/Z.
inserthostname-here(config)#
inserthostname-here(config)#hostname iol-0
iol-0(config)#
iol-0(config)#do show ip interface
Ethernet0/0 is administratively down, line protocol is down
  Internet protocol processing disabled
Ethernet0/1 is administratively down, line protocol is down
  Internet protocol processing disabled
Ethernet0/2 is administratively down, line protocol is down
  Internet protocol processing disabled
Ethernet0/3 is administratively down, line protocol is down
  Internet protocol processing disabled
iol-0(config)#
iol-0(config)#interface Ethernet0/0
iol-0(config-if)#
iol-0(config-if)#ip address 192.168.0.36 255.255.255.0
iol-0(config-if)#no shutdown
iol-0(config-if)#
iol-0(config-if)#end
iol-0#
ip addressとno shutdownでNICを有効にすると以下のメッセージが出力され、リンクアップされることが確認できる。
*Mar 22 05:12:26.544: %LINK-5-UPDOWN: Interface Ethernet0/0, changed state to up
*Mar 22 05:12:27.544: %LINEPROTO-5-UPDOWN: Line protocol on Interface Ethernet0/0, changed state to up
また、この時点でCMLの外部のホストから設定したIPアドレスに対してpingの応答も確認できる。
zaki@cloud-dev2:~$ ping 192.168.0.36
PING 192.168.0.36 (192.168.0.36) 56(84) バイトのデータ
64 バイト応答 送信元 192.168.0.36: icmp_seq=1 ttl=255 時間=1.64ミリ秒
64 バイト応答 送信元 192.168.0.36: icmp_seq=2 ttl=255 時間=0.889ミリ秒
64 バイト応答 送信元 192.168.0.36: icmp_seq=3 ttl=255 時間=0.812ミリ秒
仮想ルーターのSSHサーバー設定
ネットワーク的に外部と疎通が確認できたが、ここからさらにSSHサーバーを設定し、外部からSSH接続できるようにする。
最低限必要なのは、アカウントの認証設定とSSHの有効化。
まずはSSHに関して初期状態を確認。
iol-0>show ip ssh
SSH Disabled - version 2.0
%Please create EC or RSA keys to enable SSH (and of atleast 2048 bits for SSH v2 in case of RSA).
Authentication methods:publickey,keyboard-interactive,password
Authentication Publickey Algorithms:ssh-rsa,ecdsa-sha2-nistp256,ecdsa-sha2-nistp384,ecdsa-sha2-nistp521,ssh-ed25519,x509v3-ecdsa-sha2-nistp256,x509v3-ecdsa-sha2-nistp384,x509v3-ecdsa-sha2-nistp521,rsa-sha2-256,rsa-sha2-512,x509v3-rsa2048-sha256
Hostkey Algorithms:ecdsa-sha2-nistp256,ecdsa-sha2-nistp384,ecdsa-sha2-nistp521,rsa-sha2-512,rsa-sha2-256,ssh-rsa
Encryption Algorithms:chacha20-poly1305@openssh.com,aes128-gcm@openssh.com,aes256-gcm@openssh.com,aes128-gcm,aes256-gcm,aes128-ctr,aes192-ctr,aes256-ctr
MAC Algorithms:hmac-sha2-256-etm@openssh.com,hmac-sha2-512-etm@openssh.com
KEX Algorithms:curve25519-sha256,curve25519-sha256@libssh.org,ecdh-sha2-nistp256,ecdh-sha2-nistp384,ecdh-sha2-nistp521,diffie-hellman-group14-sha256,diffie-hellman-group16-sha512
Authentication timeout: 120 secs; Authentication retries: 3
Minimum expected Diffie Hellman key size : 2048 bits
IOS Keys in SECSH format(ssh-rsa, base64 encoded): NONE
IOS Keys in SECSH format(ssh-ec, base64 encoded): NONE
1行目の「SSH Disabled」で有効になっていないことと、2行目の「Pelase create EC or RSA keys ...」で鍵の作成が必要なことが確認できる。
アカウントの認証設定
SSH接続するためのユーザーとそのパスワードを設定。
ここではユーザー名cisco、パスワードもcisco
iol-0(config)#username cisco password cisco
 WARNING: Command has been added to the configuration using a type 0 password. However, recommended to migrate to strong type-6 encryption
iol-0(config)#
暗号強度まわりで警告は出てるけど検証環境なのでとりあえず気にしない。
*Mar 22 05:36:37.788: %AAA-6-USERNAME_CONFIGURATION: user with username: cisco configured
*Mar 22 05:36:37.788: %AAAA-4-CLI_DEPRECATED: WARNING: Command has been added to the configuration using a type 0 password. However, recommended to migrate to strong type-6 encryption
次にenableで特権ユーザーに昇格する際のパスワードを設定。
ここでもciscoをセット。
iol-0(config)#enable secret cisco
iol-0(config)#
認証周りはこれで完了。
(この設定でenableはパスワード入力が必要になる)
SSHサーバー設定
RSA暗号鍵を作るためにはドメインが設定されている必要があるため設定する。
検証用の設定なので、とりあえずなんでも良い…と思う。
iol-0(config)#ip domain name jp-z.jp
iol-0(config)#
初期状態ではRSA暗号鍵がないため作成する。
iol-0(config)#crypto key generate rsa
The name for the keys will be: iol-0.jp-z.jp
Choose the size of the key modulus in the range of 2048 to 4096 for your
  General Purpose Keys. Choosing a key modulus greater than 512 may take
  a few minutes.

How many bits in the modulus [2048]:

% Generating 2048 bit RSA keys, keys will be non-exportable...
[OK] (elapsed time was 1 seconds)

iol-0(config)#
メッセージを見るとRSAの鍵作成コマンドは無くなるらしいがとりあえずこれで進める。(おそらくrsaでなくecを使えば良さそう)
*Mar 22 05:48:50.884: %PARSER-5-HIDDEN: Warning!!! ' crypto key generate rsa ' is a hidden command. Use of this command is not recommended/supported and will be removed in future.
SSH接続時に前述の認証設定でセットした情報で認証するため、VTYのローカル認証を設定する。
iol-0(config)#line vty 0 4
iol-0(config-line)#login local
iol-0(config-line)#
これで外部からSSH接続し、enableで昇格できるようになる。
zaki@cloud-dev2:~$ ssh cisco@192.168.0.36
The authenticity of host '192.168.0.36 (192.168.0.36)' can't be established.
RSA key fingerprint is SHA256:pmhhpC8buz+z2bBZPUbIeco5GiEJpYxm3iQA1GDAkxI.
This key is not known by any other names.
Are you sure you want to continue connecting (yes/no/[fingerprint])? yes
Warning: Permanently added '192.168.0.36' (RSA) to the list of known hosts.
(cisco@192.168.0.36) Password:


iol-0>
iol-0>enable
Password:
iol-0#
iol-0#
VTYが現状何かわかってないんだよね。。
- ACL - VTYへのアクセス制御(access-class)
- line vty 0 4+password~|Ciscoルータコマンド|レンタルネットワーク
- VTYポート | aiueo700-newのブログ
設定保存
このままだとリブート等で設定は消えるので保存。
iol-0#write
Building configuration...
[OK]
iol-0#
SSH接続おためしAnsible
せっかくSSHでツナガルようになったので、外からAnsibleでコネクトしてみる。
Ansible以外には、paramikoでなくansible-pylibsshが必要なのでpipで入れておく。(paramikoだと認証エラーになった)
---
- hosts: all
  gather_facts: false

  tasks:
  - name: gether facts
    cisco.ios.ios_facts:
      gather_subset: all
インベントリ
[ios]
iol-0   ansible_host=192.168.0.36

[ios:vars]
ansible_user=cisco
ansible_password=cisco
ansible_network_os=cisco.ios.ios
ansible_connection=ansible.netcommon.network_cli
ansible_become=true
ansible_become_method=enable
ansible_become_password=cisco
実行結果はこの通り、IOSの情報が取れた。
(ansible) (master *%=) zaki@cloud-dev2:~/local/src/ansible-sample/cisco$ ansible-playbook playbook.yml -i inventory.ini -v
No config file found; using defaults

PLAY [all] *******************************************************************************************************

TASK [gether facts] **********************************************************************************************
ok: [iol-0] =>
    ansible_facts:
        ansible_net_all_ipv4_addresses:
        - 192.168.0.36
        ansible_net_all_ipv6_addresses: []
        ansible_net_api: cliconf
        ansible_net_config: |-
            Building configuration...

            Current configuration : 1021 bytes
            !
            ! Last configuration change at 05:51:20 UTC Sat Mar 22 2025
            !
            version 17.15
            service timestamps debug datetime msec
            service timestamps log datetime msec
            !
            hostname iol-0
            !
            boot-start-marker
            boot-end-marker
            !
            !
            no aaa new-model
            !
            !
            !
            !
            !
            !
            !
            !
            !
            !
            !
            !
            !
            ip domain name jp-z.jp
            ip cef
            login on-success log
            no ipv6 cef
            !
            !
            !
            !
            !
            !
            !
            !
            !
            !
            !
            !
            !
            memory free low-watermark processor 80093
            !
            !
            spanning-tree mode rapid-pvst
            !
            enable secret 9 $9$BmucRIe.5HMuUE$7tmu/x2M3WFrXoaOwwaLB2jQ6crgjU5TXuCTMt.JaVE
            !
            username cisco password 0 cisco
            !
            !
            !
            !
            !
            !
            !
            !
            !
            !
            !
            !
            !
            !
            !
            !
            !
            !
            !
            !
            !
            interface Ethernet0/0
             ip address 192.168.0.36 255.255.255.0
            !
            interface Ethernet0/1
             no ip address
             shutdown
            !
            interface Ethernet0/2
             no ip address
             shutdown
            !
            interface Ethernet0/3
             no ip address
             shutdown
            !
            ip forward-protocol nd
            !
            !
            ip http server
            ip http secure-server
            ip ssh bulk-mode 131072
            no logging btrace
            !
            !
            !
            control-plane
            !
            !
            !
            line con 0
             logging synchronous
            line aux 0
            line vty 0 4
             login local
             transport input ssh
            !
            !
            !
            !
            end
        ansible_net_cpu_utilization:
            core:
                five_minutes: 0
                five_seconds: 0
                five_seconds_interrupt: 0
                one_minute: 0
        ansible_net_filesystems:
        - 'unix:'
        ansible_net_filesystems_info:
            'unix:':
                spacefree_kb: 2097148.0
                spacetotal_kb: 2097148.0
        ansible_net_gather_network_resources: []
        ansible_net_gather_subset:
        - interfaces
        - hardware
        - config
        - default
        ansible_net_hostname: iol-0
        ansible_net_image: unix:/x86_64_crb_linux-adventerprisek9-ms.iol
        ansible_net_interfaces:
            Ethernet0/0:
                bandwidth: 10000
                description: null
                duplex: null
                ipv4:
                -   address: 192.168.0.36
                    subnet: '24'
                lineprotocol: up
                macaddress: aabb.cc00.0200
                mediatype: null
                mtu: 1500
                operstatus: up
                type: AmdP2
            Ethernet0/1:
                bandwidth: 10000
                description: null
                duplex: null
                ipv4: []
                lineprotocol: down
                macaddress: aabb.cc00.0210
                mediatype: null
                mtu: 1500
                operstatus: administratively down
                type: AmdP2
            Ethernet0/2:
                bandwidth: 10000
                description: null
                duplex: null
                ipv4: []
                lineprotocol: down
                macaddress: aabb.cc00.0220
                mediatype: null
                mtu: 1500
                operstatus: administratively down
                type: AmdP2
            Ethernet0/3:
                bandwidth: 10000
                description: null
                duplex: null
                ipv4: []
                lineprotocol: down
                macaddress: aabb.cc00.0230
                mediatype: null
                mtu: 1500
                operstatus: administratively down
                type: AmdP2
        ansible_net_iostype: IOS
        ansible_net_memfree_mb: 651.7917594909668
        ansible_net_memtotal_mb: 782.1603851318359
        ansible_net_neighbors: {}
        ansible_net_operatingmode: autonomous
        ansible_net_python_version: 3.12.8
        ansible_net_serialnum: '131184642'
        ansible_net_system: ios
        ansible_net_version: 17.15.1
        ansible_network_resources: {}
    changed: false

PLAY RECAP *******************************************************************************************************
iol-0                      : ok=1    changed=0    unreachable=0    failed=0    skipped=0    rescued=0    ignored=0
繫がりました。
「ツナガル」と「コネクト」って言いたかったのかもしれない。